
How to Test Mobility Scooter Batteries with a Multimeter: A Technical Guide
A full 12.6V reading on your digital multimeter doesn't necessarily mean your mobility scooter battery is healthy. Many owners find themselves stranded on hills or facing a reduced travel range despite the display showing a full charge. This discrepancy occurs because voltage alone often hides the true condition of the internal cells. Understanding how to test mobility scooter batteries with a multimeter requires looking past the surface numbers to see how the system behaves under actual stress.
It's incredibly frustrating when your scooter cuts out unexpectedly, leaving you unsure if the fault lies with the motor, the charger, or the batteries themselves. This technical guide provides the precise steps needed to accurately diagnose your battery health and avoid unnecessary replacement costs. We'll examine the critical difference between resting voltage and load voltage, providing a definitive 'pass' or 'fail' for your current setup. You'll also learn what the specific readings on your device actually mean and which Lucas AGM battery specifications are required should a replacement be necessary.
Key Takeaways
- Learn how to select a suitable digital multimeter and follow essential safety protocols to avoid short circuits whilst testing battery terminals.
- Master the precise step-by-step process of how to test mobility scooter batteries with a multimeter by measuring each 12V unit individually for a reliable diagnosis.
- Understand why a minimum one-hour 'rest' period after charging is vital for obtaining an accurate static voltage reading rather than a misleading surface charge.
- Use the technical health chart to identify 'dead cells' and differentiate between a standard discharge and a permanent battery failure.
- Identify the correct replacement specifications by matching Amp Hour (Ah) ratings with dependable Lucas AGM deep-cycle batteries to restore your scooter's travel range.
Why Test Your Mobility Scooter Batteries with a Multimeter?
Mobility scooters typically operate on a 24V system comprised of two 12V AGM batteries connected in series. Whilst the dashboard gauge provides a visual estimate of remaining power, it is a rudimentary tool that often fails to reflect the actual health of the cells. Learning what is a multimeter and how to use it allows you to bypass these vague indicators. A digital multimeter provides a precise numerical reading, which is essential for diagnosing why a scooter might be losing power or failing to complete its usual journeys. It transforms guesswork into technical data.
Relying solely on the dashboard indicator can be misleading for many users. These gauges measure voltage but do not account for the battery's ability to maintain that voltage under the stress of the motor. It's common for a battery to appear full while stationary, only to collapse the moment you apply throttle. By understanding how to test mobility scooter batteries with a multimeter, you can identify if a specific battery in the pair has developed a high internal resistance or a dead cell. This technical approach prevents the expense of replacing a charger or motor when the issue is simply a degraded battery.
Identifying a single failing battery within a 24V pair also offers a clear economic advantage. Whilst it is always recommended to replace mobility batteries in pairs to ensure balanced charging and discharge cycles, knowing exactly which unit is failing confirms that the charger is functioning correctly. This diagnostic certainty prevents the unnecessary cost of replacing expensive electronic components when the fault is localised to the chemical storage cells. It ensures you only spend money where it's actually required to restore your mobility.
Common Signs Your Batteries Need Testing
Identifying the early symptoms of battery failure can prevent you from being stranded. If you notice any of the following behaviours, a manual health check is required:
- Reduced Travel Range: The scooter fails to cover distances that were previously easy to manage on a single charge.
- Power Loss on Inclines: The motor slows significantly or cuts out entirely when navigating slight hills or kerbs.
- Erratic Gauge Behaviour: The battery needle or LED display drops into the red zone during acceleration but returns to full when stopped.
The Difference Between Static and Load Testing
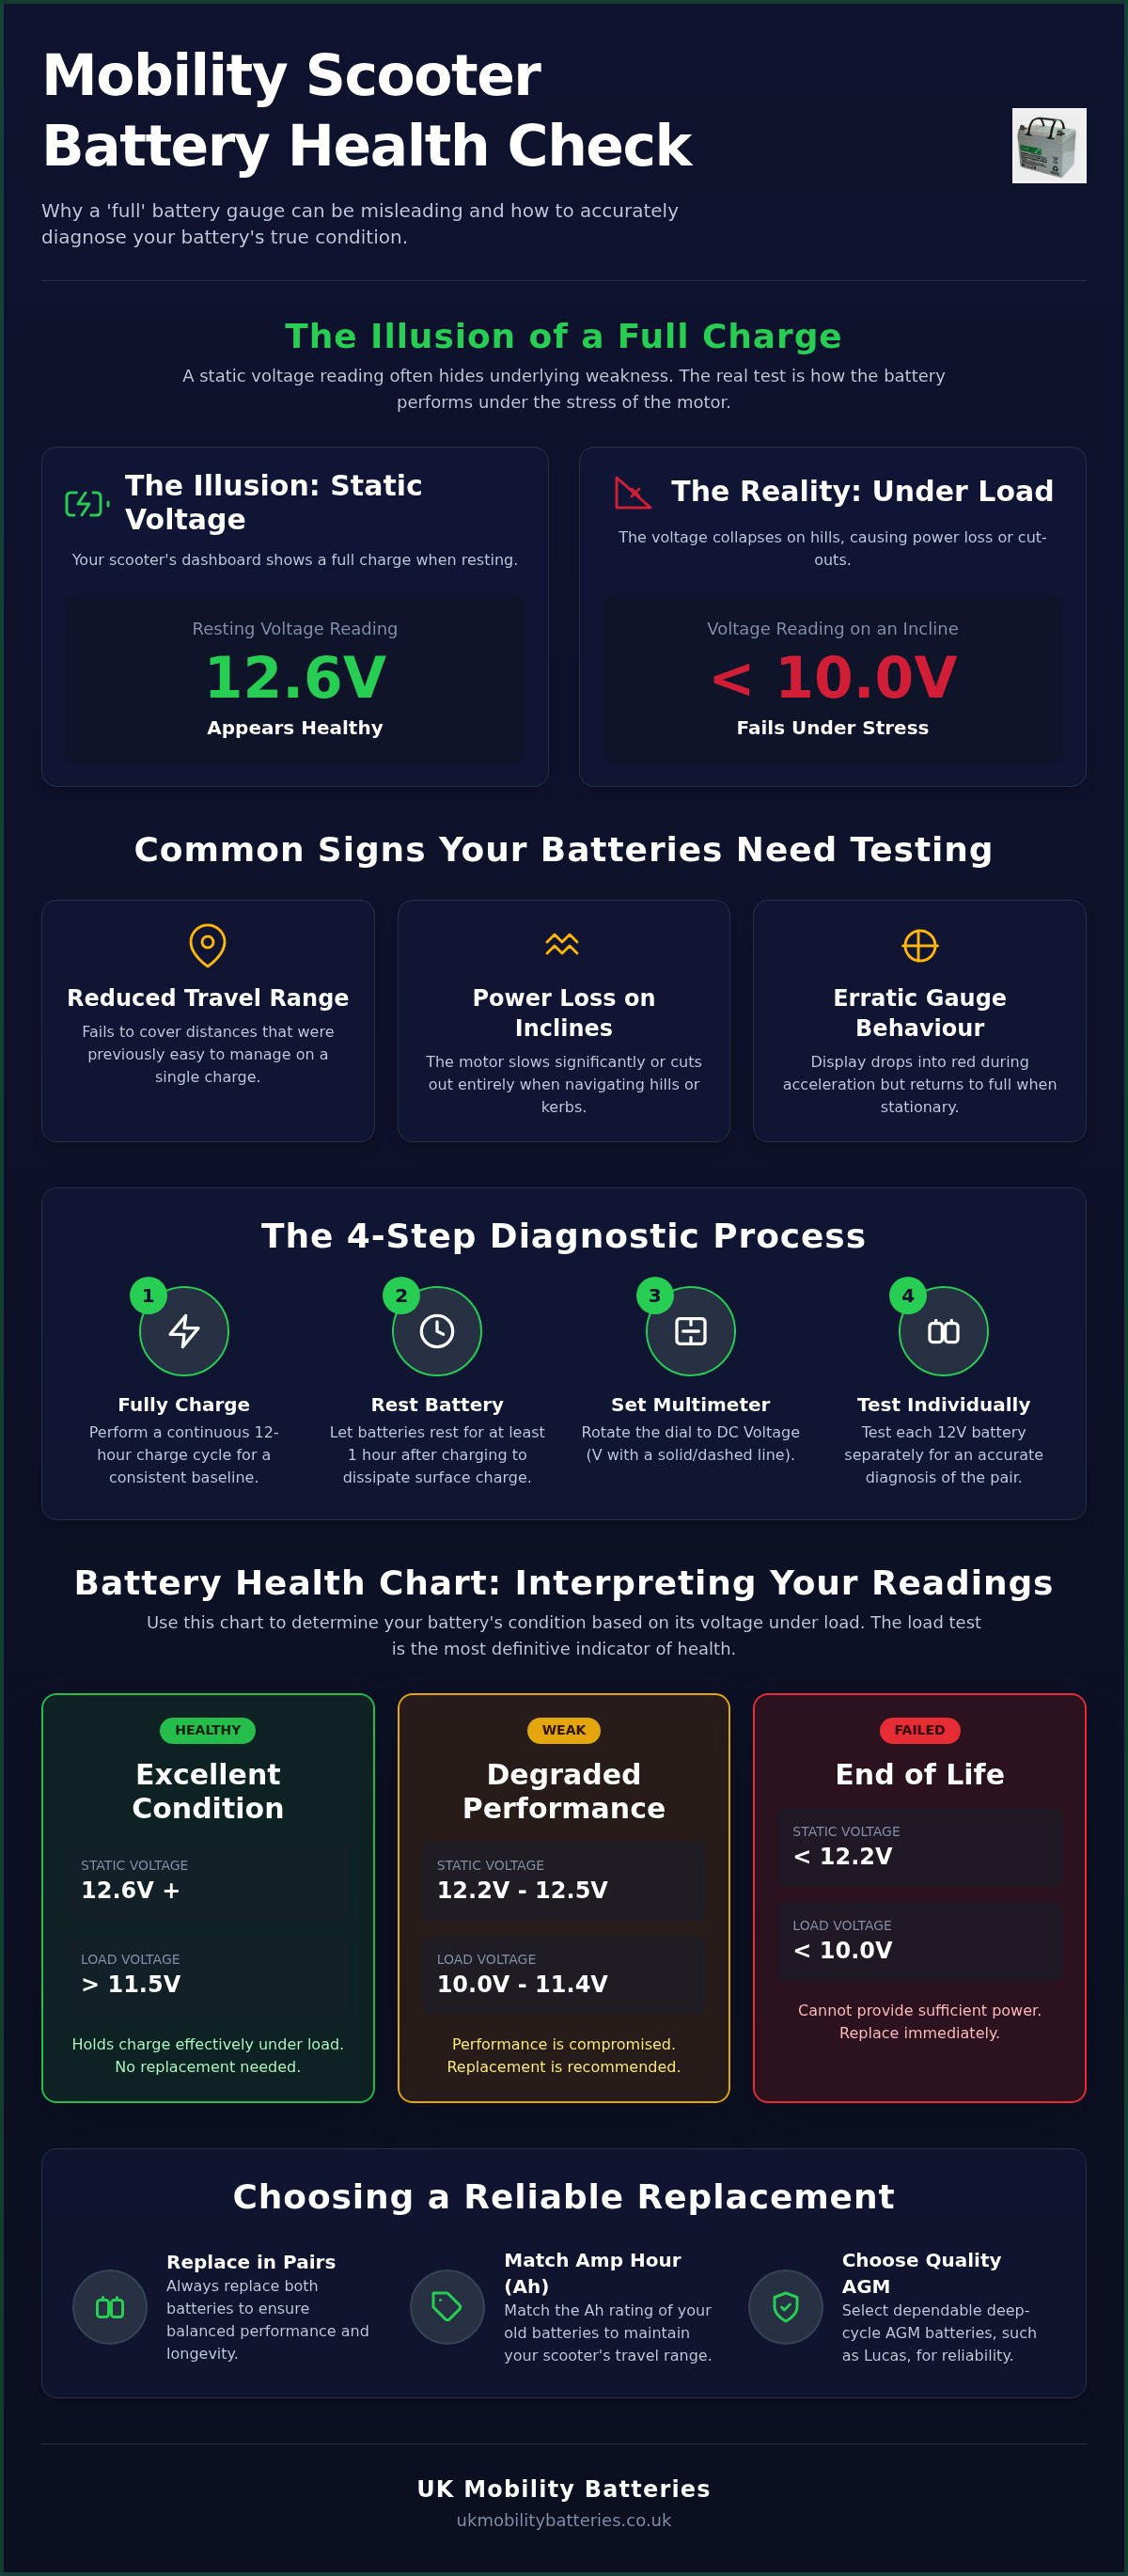
A static test measures the battery whilst it is disconnected from the charger and resting. Whilst a static reading of 12.6V to 12.8V suggests a full charge, it does not guarantee performance. Load testing is the industry standard for a definitive diagnosis. This involves measuring the voltage drop whilst the scooter motor is actively engaged. A healthy 12V Lucas AGM battery should not drop below 11.5V under moderate load. If the voltage plunges rapidly toward 10V or lower, the battery lacks the capacity to hold a charge under pressure, indicating that a replacement is necessary to restore reliability. Understanding how to test mobility scooter batteries with a multimeter under these conditions is the only way to confirm a battery's true state of health.
Essential Tools and Preparation for a Battery Health Check
Digital multimeters are the preferred choice for mobility scooter diagnostics. Analogue meters, whilst functional, often lack the resolution required to distinguish between a battery at 12.4V and one at 12.6V. This small variance is critical when determining the state of charge. When learning how to test mobility scooter batteries with a multimeter, precision is your most valuable asset. A basic digital unit capable of measuring DC voltage is sufficient for this task, provided it can display at least one decimal place.
Preparation is a vital step in the diagnostic process. You must ensure the scooter has undergone a continuous 12-hour charge cycle before testing. This provides a consistent baseline for your measurements. If you attempt to test a battery that has been sitting partially discharged, the resulting data will be skewed. This often leads to the premature replacement of a functional component. Allow the batteries to 'rest' for at least one hour after charging to dissipate any surface charge before you begin.
Setting Up Your Digital Multimeter
Correct configuration is essential when mastering how to test mobility scooter batteries with a multimeter. Rotate the central dial to the DC Voltage setting, typically indicated by a capital 'V' with a straight line above it. Avoid the 'V' with a wavy line, as this setting is for Alternating Current (AC). For a standard 12V battery, select the 20V range setting. Insert the black probe into the port labelled 'COM' and the red probe into the port marked with a 'V' or 'Ω' symbol.
Battery Access and Safety Precautions
Accessing the batteries usually involves removing the seat and lifting away a plastic shroud. In some portable models, the batteries are housed in a standalone pack that can be unclipped and moved to a workbench. Once exposed, identify the red positive (+) and black negative (-) terminals. Safety is paramount during this stage. Never allow a metal spanner or the multimeter probes to touch both terminals simultaneously. This creates a short circuit that can cause sparks, heat, or internal cell damage.
Whilst most UK scooters use AGM technology, those using newer power cells should follow guidelines for safely disposing of lithium-ion batteries if damage or instability is suspected. If your initial inspection reveals bulging casings, leaking acid, or heavily corroded terminals, skip the testing phase. These are clear indicators of physical failure. In such cases, you should browse our range of Lucas mobility batteries to find a compatible replacement that matches your scooter's original Amp Hour (Ah) specifications.
Step-by-Step Guide: Testing Mobility Scooter Battery Voltage
To obtain an accurate assessment, you must measure each 12V battery individually. Testing the combined 24V output via the external charging port is a common mistake. This method often hides a failing cell, as one healthy battery can compensate for a weaker one during a static reading. By accessing the terminals directly, you ensure each component is evaluated on its own technical merits. This is the core of how to test mobility scooter batteries with a multimeter effectively.
How to Perform the Static Voltage Test
Ensure the scooter has been disconnected from the charger for at least one hour. This allows the chemical reaction within the AGM plates to stabilise. Place the red multimeter probe firmly against the positive (+) terminal and the black probe against the negative (-) terminal. Wait for the digital display to stop fluctuating before recording the value. A fully charged, healthy 12V battery should show between 12.6V and 12.8V. Repeat this process for the second battery in the pair. If one battery reads significantly lower than the other, it indicates an imbalance that will eventually lead to total system failure.
Conducting a Real-World Load Test
A static test only tells half the story. To see how the batteries perform under stress, you need to conduct a load test whilst the batteries remain connected to the scooter. This requires an assistant to operate the controls whilst you monitor the multimeter. Attach the probes to the first battery. Ask your assistant to engage the brakes and apply the throttle for three to five seconds. Alternatively, driving the scooter against a small, immovable obstacle like a door threshold provides sufficient resistance.
Observe the digital display at the exact moment of acceleration. A healthy battery will experience a minor dip but should remain above 11.5V. If the reading plunges towards 10.5V or lower, the internal capacity is depleted. If your batteries fail this test, consult local battery recycling guidelines to ensure responsible disposal of the old units. For a deeper look into long-term maintenance, read our Ultimate Guide to Mobility Scooter Batteries UK. Recording these readings for both batteries allows you to pinpoint exactly which unit is failing the system.
Interpreting Your Multimeter Readings: Is It Time for a Replacement?
After following the technical steps on how to test mobility scooter batteries with a multimeter, you will have two sets of data: static resting voltage and load voltage. Interpreting these numbers correctly is the difference between a simple maintenance task and an expensive, unnecessary component replacement. A healthy battery doesn't just show a high number on the display; it must also demonstrate stability when the motor demands current. If your readings are inconsistent between the two 12V units, the 24V system balance is compromised, which often leads to the scooter cutting out prematurely.
Voltage Health Chart for 12V AGM Batteries
The static voltage reading, taken after a rest period, indicates the battery's state of charge. Use the following technical benchmarks to evaluate your results:
- 12.7V to 13.0V: 100% charged and healthy. The battery is holding its full chemical potential.
- 12.4V to 12.6V: Good condition, approximately 75% charge. This is an acceptable level for most daily use.
- Below 12.0V: Deeply discharged. If the battery remains at this level, internal sulphation will occur, leading to permanent capacity loss.
Identifying a 'dead cell' is a priority during this phase. If a battery has been on charge for 12 hours but the multimeter reading never rises above 10.5V, one of the six internal 2.1V cells has likely failed. In a 24V system, both batteries must have similar voltage readings, ideally within 0.2V of each other. If one battery is significantly weaker, the charger cannot effectively balance the pair. This results in the 'good' battery being overcharged whilst the 'weak' battery remains undercharged, eventually destroying both units.
Analysing the Voltage Drop
The load test data you recorded provides the most accurate picture of internal health. A battery can show 12.7V at rest but fail instantly under load. Evaluate the drop using these parameters:
- Minimal drop (e.g., 12.8V to 12.2V): Excellent battery health. The internal resistance is low, and the battery can easily handle the motor's current draw.
- Moderate drop (e.g., 12.8V to 11.0V): The battery is ageing but still functional. You should begin planning for a replacement in the near future.
- Severe drop (e.g., 12.8V to below 10.0V): The battery has failed. It no longer has the chemical capacity to sustain power, which causes the scooter to stall on hills.
If your batteries show failure, read our guide on How to Change Mobility Scooter Batteries for the next steps. Occasionally, low readings are caused by a faulty charger rather than the batteries. If both batteries show identical, low voltage after a full charge cycle, test the charger output to ensure it is delivering the required 28.8V to 29.4V. For those requiring a reliable power source, we stock replacement Lucas AGM batteries with national UK delivery to get you back on the move.
Finding the Right Replacement Batteries for Your Scooter
Once you have utilised the technical steps on how to test mobility scooter batteries with a multimeter to confirm a cell failure, selecting the correct replacement is essential for restoring your scooter's performance. You don't need to purchase the same brand as the scooter manufacturer; instead, you must match the technical specifications of the original batteries. The most critical data point is the Amp Hour (Ah) rating, which determines the travel range and power delivery of the system. Ensuring a precise match or a compatible upgrade is the only way to maintain the reliability of your 24V system.
Understanding Battery Capacity (Ah)
Identify the Ah rating printed on your existing batteries. Common UK scooter configurations use 12V units in 7Ah, 12Ah, 20Ah, 34Ah, 50Ah, or 55Ah capacities. Whilst it's sometimes possible to upgrade to a higher Ah rating to increase your travel range, for example, moving from a standard 7Ah to a Lucas 12V 9Ah Uprated battery, you must ensure the physical dimensions match your battery tray perfectly. Physical size constraints are the primary limiting factor for upgrades.
Verify the Length, Width, and Height of the replacement unit before purchasing. Even a few millimetres of difference can prevent the battery shroud or seat from fitting correctly. For smaller portable scooters, see our 12V 7Ah Battery Technical Guide for specific fitting instructions and dimensional data. This ensures you select a component that is technically compatible with your specific chassis.
Why Choose Lucas Premium AGM Batteries?
Lucas AGM batteries are engineered specifically for the deep-cycle requirements of mobility devices. Unlike standard automotive batteries, these units are designed to be discharged and recharged repeatedly without permanent capacity loss. The sealed design is entirely maintenance-free, meaning there's no requirement to top up electrolyte levels. This technology also ensures consistent performance amongst the varying temperature ranges found across the UK, providing dependable power in both winter and summer conditions.
Always replace batteries in pairs for 24V systems. Installing a new battery alongside an old one creates a significant electrical imbalance. The charger cannot regulate the voltage correctly across two batteries with different internal resistances, which typically leads to the premature failure of the new unit. Once the installation is complete, ensure you organise the safe disposal of your old lead-acid batteries at a local recycling centre. Most UK civic amenity sites provide dedicated containers for lead-acid batteries to prevent environmental contamination. Selecting a high-quality Lucas 12V 34Ah or 50Ah unit ensures your scooter remains a dependable tool for daily mobility.
Maintaining Peak Performance and Reliability
Mastering how to test mobility scooter batteries with a multimeter allows you to diagnose power issues with technical precision. You've learned that a resting voltage reading is only the first step; a real-world load test is the only way to reveal the true state of your AGM cells. By identifying failing units early and ensuring your 24V system remains balanced, you prevent unnecessary damage to your scooter's motor and electronics. Remember to match your Amp Hour ratings precisely and always replace batteries in pairs to ensure long-term performance.
If your testing indicates that it's time for a replacement, we provide expert technical support for UK customers to help you select the correct specification. As specialists in Lucas AGM deep-cycle technology, we ensure you receive dependable power solutions designed for the rigours of daily mobility. Next-day delivery is available on most battery packs across the UK, helping you get back on the move without delay. Browse our range of premium Lucas mobility batteries for fast UK delivery and restore your scooter's travel range today. You now have the data needed to make an informed decision for your equipment.
Frequently Asked Questions
Can I test a mobility scooter battery without a multimeter?
Whilst you can observe symptoms like reduced range, you cannot accurately diagnose the specific fault without technical equipment. Knowing how to test mobility scooter batteries with a multimeter is the only way to get a definitive pass or fail result. Relying on the dashboard gauge is risky because these indicators are often calibrated poorly and don't reflect the battery's ability to maintain voltage under the stress of a motor.
What should the voltage be on a 24V mobility scooter?
A healthy 24V system should show a resting voltage between 25.2V and 26.0V when fully charged. This is because the system consists of two 12V batteries connected in series, each contributing roughly 12.6V to 13.0V. If your combined reading is 24.0V or lower, the batteries are actually 50% discharged or failing. Monitoring these specific thresholds is vital for ensuring your scooter has enough potential energy for safe operation.
Why does my multimeter show 12V but the scooter won't move?
A resting reading of 12.0V indicates a battery that is significantly discharged, not healthy. A fully charged AGM battery should sit at 12.6V or higher. If your multimeter shows exactly 12.0V, the battery lacks the chemical capacity to sustain the high current required by the motor. The moment you attempt to move, the voltage will likely crash below the scooter's operational threshold, causing the controller to cut power to protect the system.
Should I test the batteries whilst they are charging?
You should never test battery health whilst the charger is active. The multimeter will only show the charging voltage, which is usually between 28.8V and 29.4V for a 24V system, rather than the battery's actual stored energy. To get a valid result, disconnect the charger and wait for at least one hour. This rest period is essential to allow the surface charge to dissipate, providing a true reflection of the battery's state.
How often should I perform a battery health check?
Performing a health check every three to six months is standard practice for maintaining reliability. Regular monitoring helps you identify gradual capacity loss before it leaves you stranded. If you notice your travel range decreasing, learning how to test mobility scooter batteries with a multimeter will help you decide if a replacement Lucas battery is needed. This proactive approach ensures your scooter remains dependable for daily journeys throughout the year.
Is it possible to revive a mobility scooter battery that reads 0 volts?
Reviving a battery that reads 0 volts is generally impossible. A 0V reading typically indicates a permanent internal failure, such as a snapped lead connector or a completely shorted cell. Whilst some advanced recovery chargers can sometimes wake up batteries that have dropped to 4V or 5V, a total lack of voltage means the battery is chemically dead. In this scenario, the only safe solution is to replace the unit with a new Lucas AGM battery.
Can a faulty charger give false readings on my multimeter?
A faulty charger cannot change the multimeter's reading, but it can lead to low battery results. If the charger's internal circuitry fails, it may stop charging before the batteries reach their full potential. If your multimeter consistently shows low voltage after a full charging cycle, you should test the charger's output. A functioning 24V charger must output approximately 29V. If it doesn't, the charger is the issue rather than the batteries themselves.
Do I need to disconnect the batteries from the scooter to test them?
You do not need to physically remove the batteries, but you must expose the terminals to get an accurate reading. Testing via the external 3-pin charging port only provides a combined system voltage, which can mask a single failing cell. By placing your probes directly on the individual battery terminals, you can identify if one 12V unit is weaker than its partner. Always ensure the scooter is switched off before starting.