
How to Change Mobility Scooter Batteries: A Step-by-Step Technical Guide
Restoring a mobility scooter to full operational capacity depends entirely on the integrity of its power source. Learning how to change mobility scooter batteries correctly is essential for any owner who wants to avoid the anxiety of a breakdown or the cost of professional call-outs. You likely feel that replacing the power cells is a daunting task involving complex wiring and heavy components. It's common to worry about making a mistake with terminal colours or accidentally causing a short circuit whilst working on the electrical system.
This technical guide provides the exact data and methodical instructions needed to replace your batteries safely and efficiently to restore your independence. By following this protocol, you'll ensure the installation is correct and the connections are secure, returning your vehicle to peak performance. We'll cover necessary safety precautions, the correct sequence for terminal disconnection, and the specific methods for securing high-performance Lucas AGM batteries for long-term reliability.
Key Takeaways
- Identify the specific tools and safety protocols required to prepare your workspace and prevent electrical short circuits during the procedure.
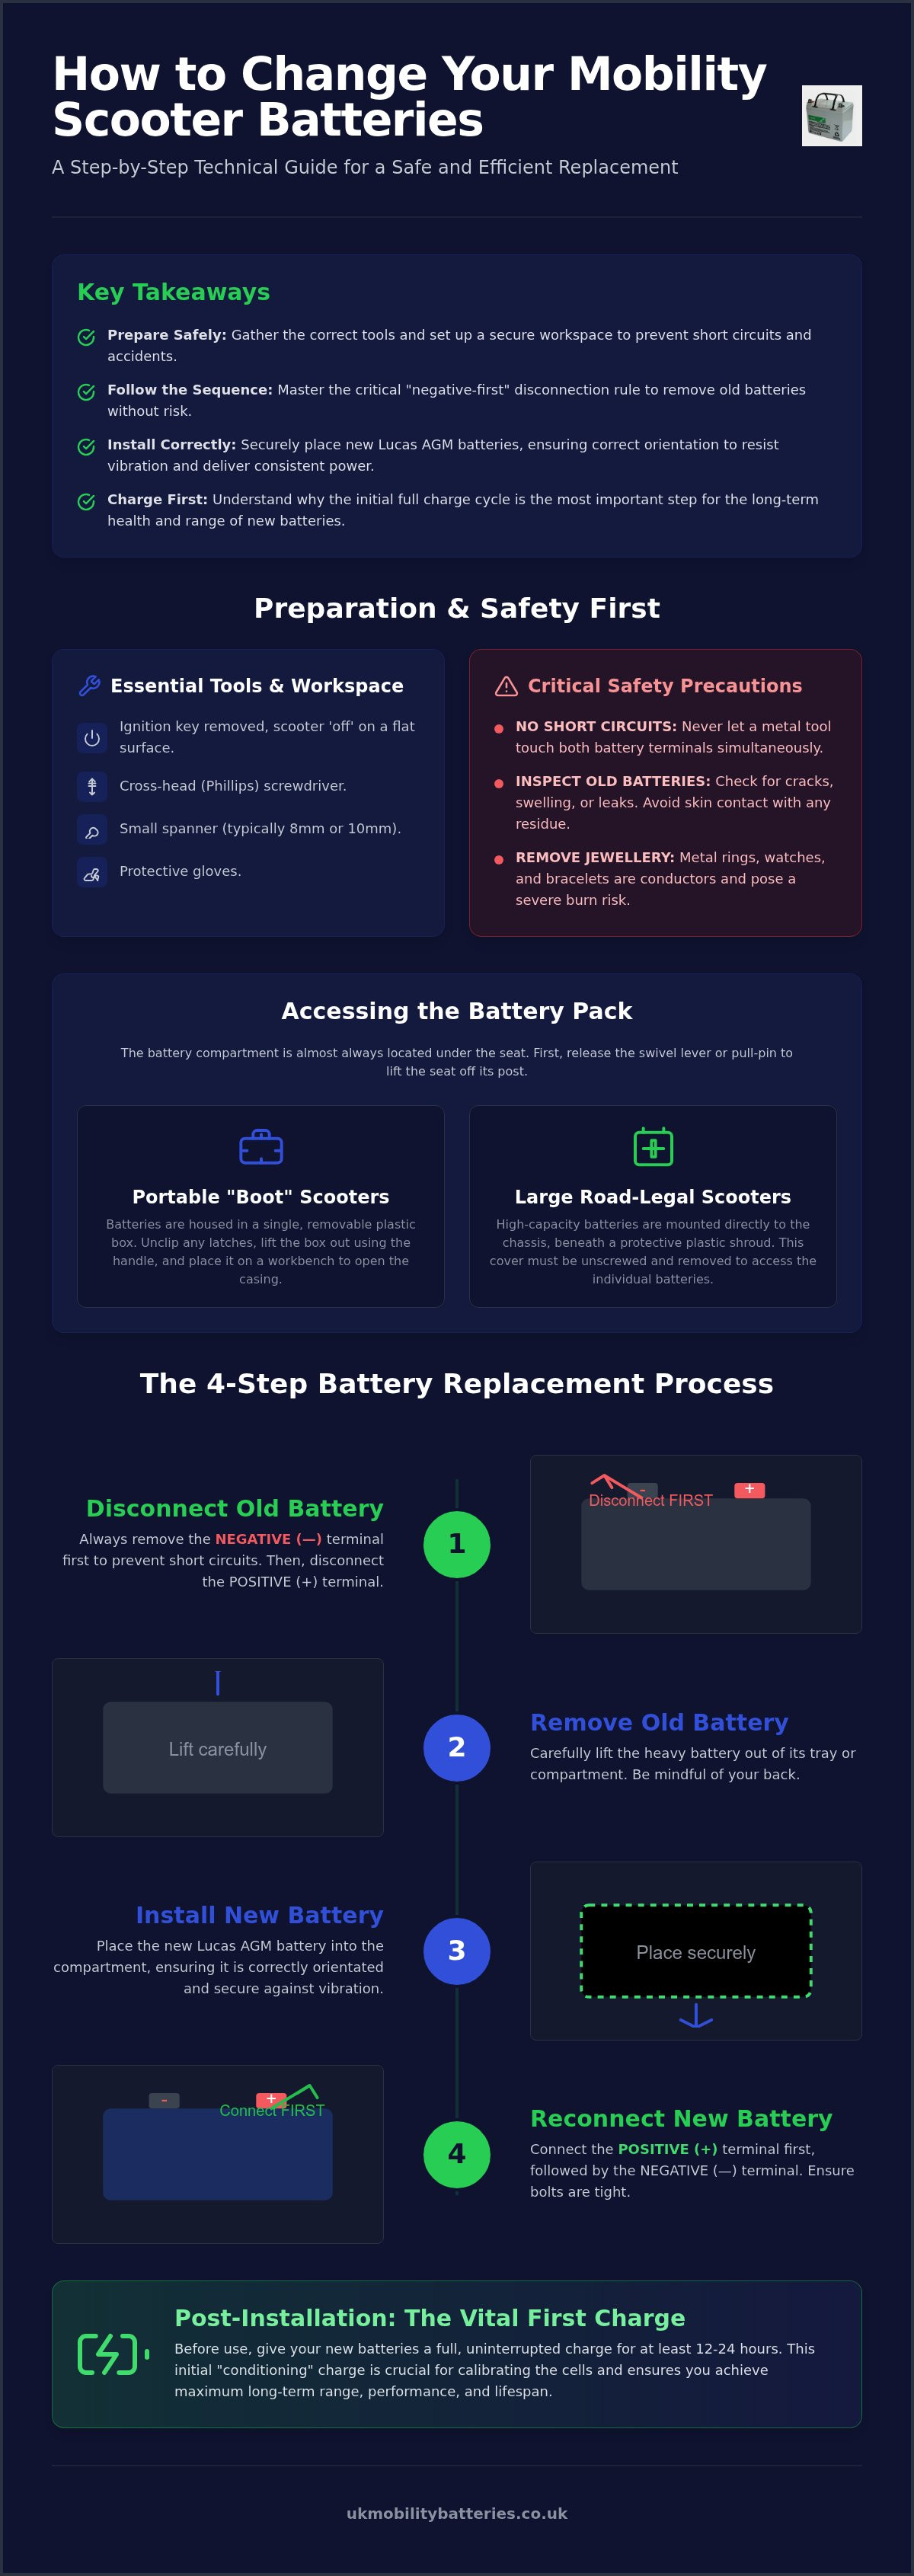
- Master the precise technical sequence of how to change mobility scooter batteries, including the critical "negative-first" disconnection rule for safe removal.
- Learn to correctly orientate and secure new Lucas AGM batteries within the tray to ensure consistent power delivery and vibration resistance.
- Discover why the initial charge cycle is the most vital step for establishing the long-term health and range of your new power cells.
- Understand the structural differences between portable and road-legal models to efficiently access the battery compartment located beneath the seat.
Preparation and Safety: Tools for a Successful Battery Change
A successful battery replacement starts with a controlled environment and the correct technical apparatus. Because a Mobility scooter relies on a high-current electrical system, safety is the primary priority. Before you begin, ensure the vehicle is parked on a flat, stable surface. Switch the ignition to the 'off' position and remove the key to isolate the electrical circuit. This prevents any accidental activation of the motor whilst you are handling internal components.
Understanding how to change mobility scooter batteries requires more than just mechanical knowledge; it requires the right tools. Most models use standard fasteners for the battery terminals and casing. You will typically need a cross-head (Phillips) screwdriver or a small spanner, usually 8mm or 10mm, for the terminal bolts. Using the correct size ensures you don't strip the bolt heads, which can complicate future maintenance. Work in a well-lit, dry area with sufficient space to move around the vehicle. Wear protective gloves to shield your hands from sharp metal edges or potential lead-acid residue that may have accumulated on older, failing units.
Essential Safety Precautions
Electrical safety is paramount. Never touch both battery terminals simultaneously with a metal tool, as this creates a short circuit and can lead to dangerous sparking or thermal runaway. Before touching the old batteries, inspect them for signs of physical damage, such as swelling, cracks, or white powdery corrosion. If you see leaking fluid, avoid contact with skin. Additionally, remove all metal jewellery. Rings, watches, and bracelets are conductive and can cause severe burns if they accidentally bridge the battery terminals.
Organising Your Workspace
Efficiency prevents errors. Use a small magnetic tray or container to hold all screws, washers, and terminal bolts. These small components are easily lost in deep carpets or cluttered floors. Clear a path to move the heavy battery units safely. Larger 12V 55Ah batteries can weigh over 15kg each, so ensure you have a clear route to prevent back strain. Keep your new replacement batteries nearby and unpacked. Having the new units ready allows for a quick swap once the old ones are removed, minimising the time the scooter's wiring is exposed.
Accessing the Battery Pack: Understanding Your Scooter Model
The method for how to change mobility scooter batteries depends significantly on the vehicle's classification and chassis design. Small portable "boot scooters" are engineered for rapid disassembly, whereas larger 8mph road-legal models prioritises structural permanence and higher capacity. Regardless of the specific model, the battery compartment is almost universally situated directly beneath the seat assembly. To begin the access procedure, you must first remove the seat. Most seats feature a swivel lever or a spring-loaded pull-pin at the base. Once the locking mechanism is released, lift the seat vertically out of the post. Set the seat aside in a clean, dry area to prevent damage to the upholstery or the swivel mechanism.
Correct identification of your battery housing is vital for a safe replacement. Whilst this guide focuses on the technical aspects of AGM battery installation, those interested in broader battery regulations and transport standards can refer to the PHMSA Lithium Battery Safety documentation for high-level guidance on energy cell handling. Identifying whether your scooter uses a standalone box or an integrated chassis mount determines the complexity of the next steps.
Removable Battery Boxes (Boot Scooters)
On portable models, batteries are typically housed in a self-contained plastic box. This unit sits on the scooter's base and connects to the motor controller via a main loom plug or a set of copper contact plates. To remove it, unclip any securing latches and lift the box by its integrated handle. Once the box is placed on a stable workbench, you'll need to open the casing. This usually involves removing several cross-head screws from the underside. Be aware that manufacturers often hide screws beneath rubber feet or warranty stickers. Carefully separate the two halves of the casing to reveal the internal batteries and the fuse assembly. If you need to verify the specific battery size for your box, you can check the technical data at UK Mobility Batteries.
Internal Chassis Mounting (Large Scooters)
Larger road-legal models don't utilise removable boxes due to the weight of the high-capacity cells. Instead, the batteries are mounted directly to the metal chassis, protected by a large plastic shroud. After removing the seat, you'll see this protective cover, which may be held in place by Velcro, plastic clips, or thumb screws. Once the shroud is lifted, the batteries are visible, typically secured by heavy-duty nylon straps or metal brackets. These restraints ensure that heavy units, such as Lucas 12V 55Ah batteries, remain stationary whilst the scooter is in motion. You'll need to work within the confines of the frame, so ensure you have clear visibility of the wiring loom before you begin disconnecting any terminals.
Step-by-Step Removal of Old Mobility Batteries
The sequence of disconnection is the most critical technical detail in learning how to change mobility scooter batteries safely. You must always disconnect the negative (black) terminal first. This rule exists because the scooter chassis often acts as a common ground. If your tool accidentally touches the metal frame whilst loosening the negative terminal, no circuit is completed. However, touching the frame whilst working on the positive terminal first can cause a high-current short circuit, leading to sparks, terminal melting, or damage to the motor controller.
Before loosening any fasteners, take a clear photograph of the existing wiring layout. Mobility scooters typically operate on a 24V system, which requires two 12V batteries connected in series. This means you will see a "bridge" wire linking the two units, along with the main positive and negative leads from the scooter's loom. Having a visual reference ensures you don't cross-wire the new units, which could cause terminal failure or blow the main fuse. Many technicians also suggest marking the wires with tape if the original colour coding has faded.
Disconnecting the Terminals Safely
Identify the terminal types before you begin. Smaller units, such as the Lucas 12V 7Ah or 9Ah, typically use spade connectors (F1 or F2) that simply pull off. Larger batteries, such as the 34Ah, 50Ah, or 55Ah models, use threaded M5 or M6 bolts. If you encounter stubborn bolts caused by surface corrosion, apply a small amount of electrical contact cleaner; don't use excessive force as this can crack the lead terminal post. Carefully unscrew the bolts and set them aside in your organised container. Ensure the bridge wire is removed and kept with the main loom wires, as you'll need this for the reinstallation.
Removing the Units
Lifting the heavy units is a physical challenge that often complicates the process of how to change mobility scooter batteries without assistance. Be mindful of the weight. Even medium-sized Lucas 12V 20Ah batteries are deceptively heavy for their size, whilst 55Ah units can exceed 15kg. If the old batteries feature integrated carry straps, use them to maintain a secure grip. Lift with your legs and keep the batteries upright to avoid any potential leakage. After removal, inspect the battery tray. Use a dry cloth to clear away dust, grit, or debris. A clean, flat surface is necessary to ensure the new batteries sit level and don't suffer from vibration-induced wear during operation.
Installing New Lucas AGM Batteries and Reconnecting
Mastering how to change mobility scooter batteries concludes with the precise re-establishment of the electrical circuit. Begin by lowering the new sealed AGM batteries into the battery tray. You must ensure they are orientated exactly as the previous units were to allow the wiring loom and bridge connectors to reach the terminals without tension. Even a minor misalignment can lead to wires rubbing against the chassis or shroud, which may eventually cause insulation failure. If you are installing high-performance units from our range of high-quality Lucas batteries, ensure the terminal posts are clean and free from packaging residue before proceeding.
The connection sequence is the technical reverse of the removal process. You must always connect the positive (red) terminal first. By securing the positive lead while the negative is still disconnected, you eliminate the risk of a short circuit if your spanner touches the metal frame. Once the positive bolt is threaded, tighten it firmly with your screwdriver or spanner. It needs to be tight enough to resist the vibrations of travel but not so tight that you strip the lead threads. Repeat this for the second battery before moving to the negative connections. Finally, re-attach any nylon straps or metal brackets. These components are vital for preventing the batteries from shifting whilst you navigate kerbs or uneven terrain.
Wiring the Series Connection
Most mobility scooters use a 24V motor system powered by two 12V batteries wired in series. To achieve this, you must install the bridge wire correctly. Connect the positive terminal of the first battery to the negative terminal of the second battery using the original bridging lead. This configuration doubles the voltage whilst maintaining the same Ampere-hour (Ah) capacity. Refer to the photograph you took during the removal stage to verify that the main positive and negative leads from the scooter's controller are attached to the remaining open terminals. Incorrect series wiring will result in a lack of power or may blow the primary circuit breaker.
Final Checks and Shroud Replacement
Before closing the compartment, perform a physical inspection of the wiring. Ensure no cables are pinched or trapped in positions where the seat or shroud might crush them. Perform a "tug-test" on each connector to confirm that the bolts are secure and the electrical contact is solid. If your scooter uses a battery box, align the lid carefully and replace all screws, ensuring the waterproof seal is intact. Lower the seat back onto the post and press down firmly until you hear the locking mechanism click. This confirms the vehicle is structurally sound and ready for its initial testing phase.
Post-Installation Care: Testing and the First Charge
Completing the technical steps for how to change mobility scooter batteries is only part of the restoration process. Proper commissioning of the new power cells is required to ensure their longevity and performance. Once the seat is secured and the wiring verified, you must immediately connect the scooter to its dedicated charger. This initial cycle is the most important event in the battery's service life, as it chemically prepares the plates for deep-cycle operation.
The Initial 12-Hour Charge
Connect the charger to the scooter's charging port before plugging it into the mains. You should leave the batteries on charge for at least 12 hours, or until the charger displays a solid green "complete" light. Even if the charger indicates a full charge sooner, the extended time allows the cells to balance. Avoid the temptation to take a test drive before this process finishes. AGM batteries often require several full charge and discharge cycles to reach their peak rated capacity. Premature use can limit the ultimate range of your vehicle.
After the first charge, conduct a functional test in a safe, flat area to verify how to change mobility scooter batteries successfully. Switch on the ignition and check the battery gauge for a full reading. Test the forward and reverse controls at low speed to ensure the motor controller responds correctly. If the scooter doesn't power up or displays an error code on the dashboard, consult our mobility scooter battery troubleshooting guide. This resource helps you identify common issues, such as loose terminal bolts or tripped circuit breakers, that may have occurred during the installation.
Ongoing Maintenance Tips
To maintain the reliability of your Lucas batteries, follow a disciplined charging regime. You should avoid letting the capacity drop below 50% whenever possible. Deeply discharging AGM batteries frequently will shorten their total cycle life. For detailed information on charging safety, refer to our guide on can you overcharge a mobility scooter battery. Additionally, keep the terminal posts clean and dry. Periodic inspections for dust or moisture prevent parasitic power loss and ensure a consistent electrical connection for every journey.
Finally, dispose of your old lead-acid batteries responsibly. These units contain hazardous materials and must not be placed in domestic waste. Take them to a local recycling centre that accepts automotive or mobility batteries. Most municipal sites have dedicated areas for lead-acid cells; this ensures the lead and plastic components are reclaimed without harming the environment.
Restoring Your Scooter's Reliability and Range
Executing a methodical battery replacement ensures your vehicle remains a dependable tool for daily independence. By adhering to the safety protocols discussed, such as the negative-first disconnection rule and the 12-hour initial charge, you protect both the electronic controller and the long-term health of your new power cells. Understanding how to change mobility scooter batteries allows you to maintain your equipment with professional precision, avoiding unnecessary service costs and downtime.
As an authorised Lucas battery specialist, we provide maintenance-free AGM technology designed for deep-cycle performance and durability. Whether you require compact 7Ah cells or high-capacity 55Ah units, our expert technical support is available for all UK orders to ensure you select the correct specification for your model. Browse our range of premium Lucas mobility batteries with fast UK delivery to secure the energy source your scooter needs. With the right components and a careful installation, you can travel with confidence knowing your scooter is safe and its range is fully restored.
Frequently Asked Questions
How often should I change my mobility scooter batteries?
You should typically replace your batteries every 12 to 18 months to maintain peak performance. This duration varies based on your daily mileage and how strictly you follow a charging routine. If your vehicle feels sluggish or the dashboard gauge drops rapidly during use, the internal capacity has likely degraded. Learning how to change mobility scooter batteries at this stage prevents you from being stranded during a journey.
Can I change just one battery if the other seems fine?
No, you should never replace only one battery in a dual-battery system. Mobility scooters use two 12V batteries in series to provide 24V. If you mix a new battery with an old one, the differences in internal resistance will cause the new unit to overcharge or discharge unevenly. This imbalance quickly ruins the new battery and can lead to unreliable power delivery.
Do I need to charge my new batteries before using the scooter for the first time?
You must complete a full 12-hour charge cycle before using the scooter for the first time. Although Lucas AGM batteries are supplied with a factory charge, they require this initial deep charge to balance the internal cells. Skipping this step can permanently reduce the overall capacity and lifespan of the battery pack. Patience during this first cycle is vital for long-term reliability.
What should I do if my scooter doesn’t turn on after changing the batteries?
Check the terminal connections and the main circuit breaker if the scooter fails to power up. It is easy for a wire to become loose during reassembly or for the reset button to trip. Ensure the bridge wire is making solid contact with the terminals. If the vehicle still doesn't start, verify that the battery loom plug is pushed firmly into the socket.
Are all mobility scooter batteries the same size?
Battery sizes are not universal; they vary significantly based on their Ampere-hour (Ah) rating. For example, a Lucas 12V 12Ah battery has different physical dimensions than a 12V 34Ah model. Always measure your existing batteries' length, width, and height before ordering replacements. You must ensure the new units fit within the tray and allow the protective shroud to be replaced correctly.
How do I dispose of my old mobility scooter batteries in the UK?
You should take old lead-acid batteries to your local council's household waste recycling centre. These units contain hazardous chemicals and must be handled through official recycling streams. Most UK centres have a dedicated area for automotive and mobility batteries. This ensures that lead and plastic components are safely reclaimed and kept out of the general waste system.
Can I replace my 34Ah batteries with 50Ah batteries for more range?
You can only upgrade to 50Ah batteries if they fit within the physical space of your battery tray. Increasing the Ah rating will extend your travel range, but higher capacity batteries are larger and heavier. Check the technical specifications of your scooter to ensure the motor and charger can handle the increased capacity. Never force a larger battery into a space that is too small.
Is it safe to change mobility scooter batteries myself?
It is safe to perform a DIY replacement provided you follow the methodical process for how to change mobility scooter batteries. Always remove the key from the ignition and wear gloves to protect against sharp edges. The most critical safety step is disconnecting the negative (black) terminal first to prevent short circuits. If the batteries are too heavy for you to lift safely, seek assistance.