
Fitting New Batteries to a Mobility Scooter: A Comprehensive Technical Guide (2026)
The long-term reliability of your mobility scooter depends less on the brand of the battery and more on the precision of the physical installation. It's understandable to feel concerned about the physical weight of Lucas AGM units or the risk of a short circuit during the wiring process. Managing terminal types like F1, F2, or M5 threaded inserts requires technical accuracy to prevent electrical resistance and heat buildup. If you've ever worried about connecting cables in the wrong sequence, you aren't alone.
This technical guide simplifies the process of fitting new batteries to mobility scooter models by providing clear, data-driven instructions for wiring and testing. We provide the exact steps needed to handle heavy deep-cycle batteries safely and ensure every connection is secure. You'll learn how to identify your specific terminal configuration, execute a safe wiring sequence, and verify the final 24V output. Following these protocols ensures your equipment returns to peak performance with a restored travel range and total electrical safety.
Key Takeaways
- Prepare a dedicated technical workspace and gather essential tools, including an adjustable spanner and wire brush, to ensure clean terminal contact.
- Master the precise steps for fitting new batteries to mobility scooter models by correctly identifying terminal types and polarity markings.
- Ensure physical and electrical stability by following specific orientation protocols when placing Lucas AGM units into the battery tray.
- Execute post-fitting diagnostic checks, including gauge verification and controller feedback, to confirm system integrity before operation.
- Implement maintenance-free charging habits that prevent sulphation and extend the service life of your high-performance deep-cycle batteries.
Essential Preparation for Fitting New Mobility Batteries
Successful installation begins with a methodical approach to your environment. Before you begin fitting new batteries to mobility scooter units, you must establish a stable workspace. Choose a flat, level surface with ample overhead lighting. This ensures you can clearly see the small polarity markings and terminal labels on your new Lucas AGM batteries. Ensure the scooter is completely powered down and the ignition key is removed to prevent accidental activation during the procedure.
Gathering the correct technical equipment for fitting new batteries to mobility scooter models prevents delays and damage to the hardware. You will typically require an adjustable spanner for terminal bolts, a cross-head screwdriver for casing screws, and a wire brush to address any surface oxidation on the leads. Whilst battery powered mobility scooters are designed for user-friendliness, the high-capacity cells within them are heavy and contain chemical components. Always wear protective gloves and eye protection to safeguard against skin irritation or accidental debris.
Safety Precautions and Short Circuit Prevention
Short circuits are a primary risk when working with high-amperage electrical systems. Before disconnecting any cables, locate the main fuse. It's usually found near the battery pack or along the main wiring loom; verify that it's intact and free from heat damage. You must remove all metal jewellery, including rings and watches. Metal objects can bridge the gap between positive and negative terminals, causing an immediate high-current short circuit. Keep a roll of electrical tape or the original terminal covers nearby. Masking the exposed terminals as you work provides an extra layer of insulation against accidental tool contact.
Inspecting the Battery Tray and Cables
Removing the old units offers a rare opportunity to inspect the internal chassis. Examine the battery tray for signs of white powdery deposits or liquid residue, which indicate acid leakage from previous lead-acid cells. If you find corrosion, clean the area thoroughly with a neutralising solution before installing your new Lucas mobility batteries. Inspect the entire wiring harness for frayed insulation or exposed copper strands. Check the connector pins for signs of loosening or pitting caused by arcing. Use a wire brush or fine-grade sandpaper to remove oxidation from the cable lugs until the metal appears bright. This ensures the lowest possible electrical resistance for your new power source.
Identifying Battery Terminals and Wiring Configurations
Accurate technical identification is the second critical phase of fitting new batteries to mobility scooter models. You must verify that your replacement units match the physical and electrical specifications of the original equipment. Standard UK mobility scooters typically operate on a 24V system, which is achieved by connecting two 12V batteries in a series configuration. Whilst selecting your replacement units, ensure the Amp-hour (Ah) rating is compatible with your battery box dimensions. A higher Ah rating provides an extended travel range, but it often results in a larger physical casing that may not fit the existing tray or mounting bracket.
Common Terminal Types: F1, F2, and Bolt-on
Small to medium scooters often use spade terminals. These are classified as F1, which are 4.75mm wide, or F2, which are 6.35mm wide. It's vital to measure your existing connectors precisely; an F2 connector will fit loosely on an F1 terminal, leading to vibration-induced disconnection or electrical arcing. Larger powerchairs and Class 3 scooters usually require threaded insert terminals or flag terminals. When securing bolts into threaded inserts, use enough torque to ensure a firm contact without stripping the soft lead threads. If you're unsure which terminal type your equipment requires, browsing the Lucas mobility battery range can help you identify the correct specification for your specific model.
Series Wiring: Creating a 24V Power Loop
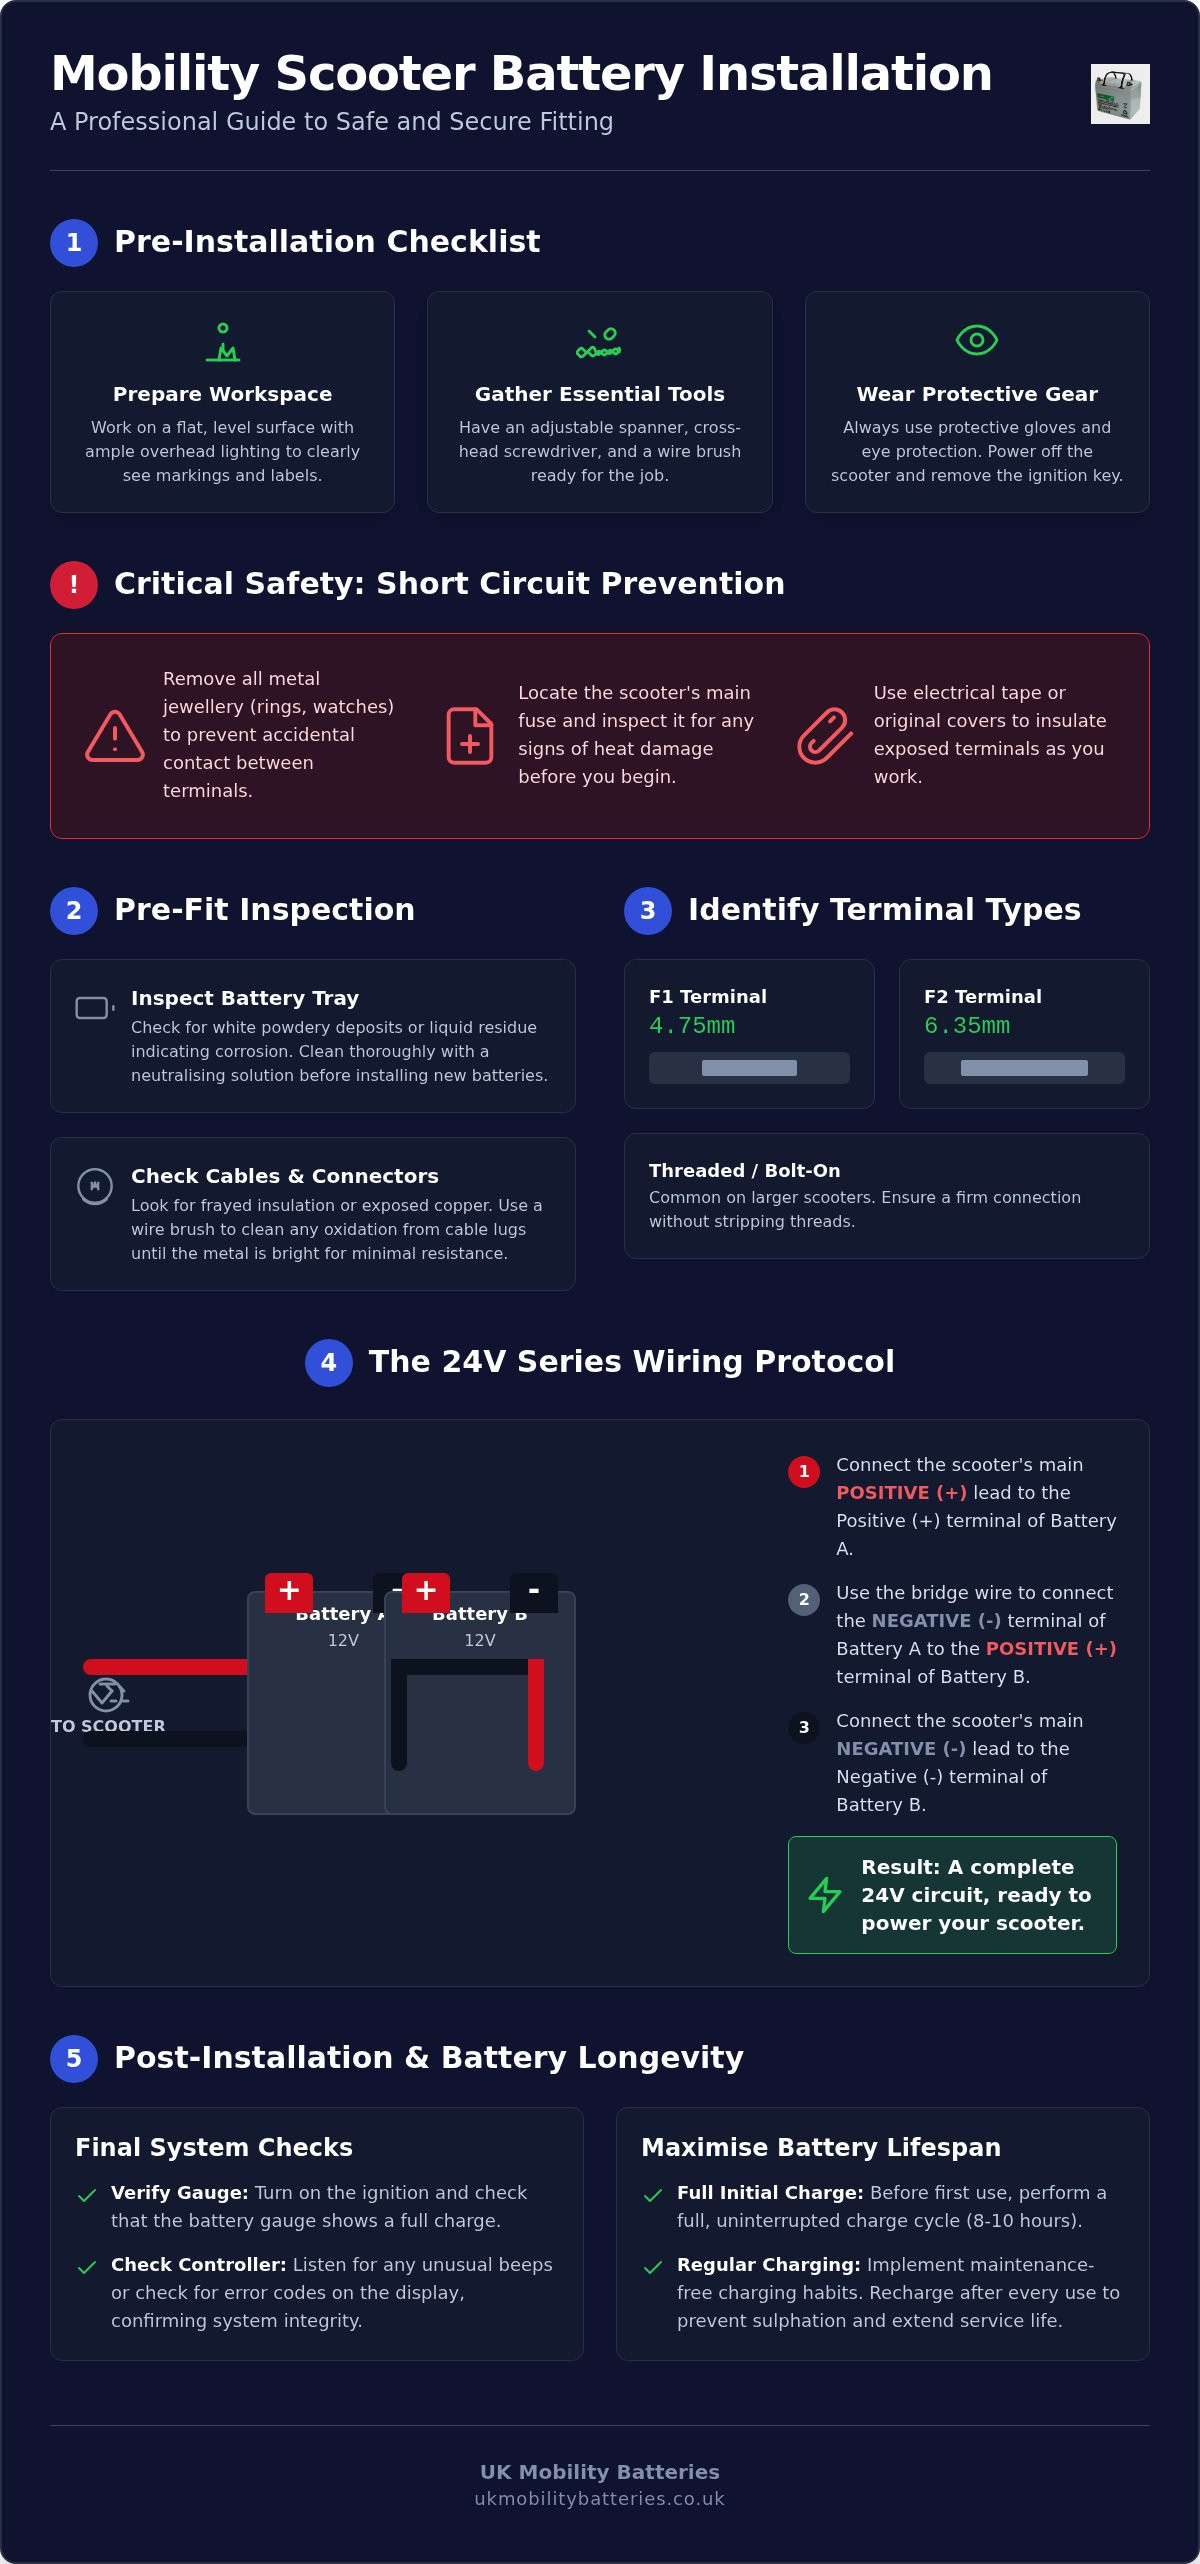
Creating a 24V circuit requires a specific wiring sequence known as a series connection. This loop is established using a bridge wire that links the two batteries together. Follow this precise sequence to ensure a safe installation:
- Connect the positive (+) terminal of Battery A to the scooter's main positive lead.
- Connect the negative (-) terminal of Battery A to the positive (+) terminal of Battery B using the bridge wire.
- Connect the negative (-) terminal of Battery B to the scooter's main negative lead.
Always identify polarity by the colour-coded markings: Red signifies Positive (+) and Black signifies Negative (-). Incorrect series wiring can cause a catastrophic short circuit that destroys the scooter's controller or initiates a fire.
Before proceeding to the physical installation, double-check that all terminal nuts, bolts, or spade connectors are clean. Any dirt or grease on these contact points increases electrical resistance, which reduces the efficiency of your new power system. Matching the exact terminal style ensures the connection remains stable even when travelling over uneven pavements or kerbs.
Step-by-Step Guide: Fitting Your New Batteries Safely
Physical installation requires steady movement and attention to detail. Start by lifting the old units out of the chassis. Since deep-cycle batteries are heavy, use both hands and maintain a straight back to prevent injury. Note the exact orientation of the existing terminals before removal. This serves as a template for the new installation. Place the new Lucas mobility batteries into the tray. They must sit perfectly level. Any unevenness can lead to physical stress on the casing or cause the battery to shift during transit.
When you begin the wiring process, connect the bridge wire first. This establishes the series link between the two 12V units before they are integrated into the scooter's main electrical system. Once the bridge is secure, attach the main positive and negative scooter cables. Tighten all fasteners with your spanner until they are firm. Over-tightening can damage the lead terminals, whilst loose connections cause electrical resistance and heat. Finally, apply a thin layer of petroleum jelly or specialist terminal grease to the exposed metal. This prevents atmospheric moisture from causing oxidation and corrosion.
Securing the Batteries in the Housing
Mechanical stability is just as important as electrical contact. Check that the battery straps or hold-down brackets are tightened sufficiently to prevent any internal movement. Vibration during travel on uneven pavements can loosen terminals over time. Carefully tuck the wiring harness into the sides of the compartment. Ensure no wires are pinched between the battery casing and the outer shroud. The battery box lid should fit flush; if you have to force the plastic, a wire is likely misaligned or the batteries are not seated correctly.
Testing the Connection Integrity
Perform a mechanical check on every connection before closing the unit. Gently tug each wire to ensure the terminal connection does not wiggle or slide. A loose spade or bolt-on terminal will eventually arc, potentially damaging the wiring harness. Verify that the main fuse is correctly seated in its holder. If your scooter has a specific modular battery pack or a non-standard layout, consult the how to change mobility scooter batteries pillar for model-specific variations. This final verification step ensures the process of fitting new batteries to mobility scooter units is successful before you attempt the first power-up.
Post-Fitting Procedures and Common Installation Issues
After fitting new batteries to mobility scooter units, you must perform a methodical validation sequence to ensure the electrical system is stable. Turn the ignition key to the "on" position and observe the tiller display. The battery gauge should show a full or near-full reading. Listen closely for any unusual clicking sounds originating from the controller area. A repetitive clicking often indicates a high-resistance contact point or a loose ground connection that requires immediate tightening. By following these post-installation protocols, you confirm that fitting new batteries to mobility scooter hardware has been executed with the necessary technical precision.
Conduct a brief functional test drive on a flat, level surface before attempting regular use. Power delivery should be smooth and consistent without any stuttering, surging, or "voltage sag" under light acceleration. Do not take the scooter on a long journey or attempt steep inclines immediately after installation. The internal chemistry of new AGM batteries requires a specific conditioning period to reach peak performance levels. If your current setup fails these basic operational tests, you can order replacement Lucas AGM batteries with fast national delivery to ensure your equipment remains dependable.
The Critical First Charge Cycle
Connect the manufacturer-approved charger immediately after the physical installation is complete. Allow the batteries to receive a full, uninterrupted charge for 12-14 hours. New deep-cycle batteries typically reach approximately 80% of their total capacity upon delivery and require 10-15 full charge and discharge cycles before they achieve their maximum rated performance. This "breaking-in" period is essential for the long-term health of the lead plates inside the Lucas units. Interrupting the first charge cycle can lead to permanent sulphation and a significant reduction in the battery's total service life.
Troubleshooting: What if the Scooter Won’t Start?
If the scooter fails to power up, check the circuit breaker first. This is usually a small protruding button located on the battery pack or the main chassis that may have tripped during the wiring process. Verify that the main fuse is intact and that no wires have shifted or become pinched during the reassembly of the battery shroud. A common oversight is the position of the "freewheel" lever; ensure it is firmly in the "drive" position, as the motor controller will prevent the system from starting if the electronic brake is disengaged. For more complex electrical faults or diagnostic codes, refer to our guide on mobility scooter battery troubleshooting for advanced technical assistance.
Maximising the Lifespan of Your New Lucas Batteries
The longevity of your power system is determined by your daily maintenance routine. Once you have completed the process of fitting new batteries to mobility scooter models, you must adopt a rigorous charging schedule to preserve the lead plates. AGM batteries perform best when they are kept at a high state of charge. You should develop a "charge after every use" habit, regardless of the distance travelled during the day. Allowing the cells to enter a deep discharge state regularly will lead to premature capacity loss and reduced voltage stability. Never leave your scooter in a discharged state for more than 24 hours. This delay triggers sulphation, a chemical process where lead sulphate crystals harden on the plates, permanently reducing the total energy storage capacity.
Environmental factors also play a critical role in preservation. Store your scooter in a cool, dry environment whenever possible. Extreme heat accelerates the internal chemical reactions that lead to battery degradation, whilst freezing temperatures can temporarily reduce the available power output. For those seeking consistent reliability without the need for electrolyte checks, the technical benefits of maintenance free mobility batteries are clear. These sealed units prevent leakage and require no topping up, making them the standard choice for modern mobility applications where dependable performance is a priority.
Charging Best Practices for AGM Technology
Precision in charging equipment is as vital as the batteries themselves. Always use a dedicated smart charger designed specifically for AGM technology. These devices follow a multi-stage profile that automatically switches to a float mode once the cycle is complete, which maintains the charge without overheating the cells. You must avoid using automotive car chargers. Car chargers typically provide a high-current "bulk" charge that is too aggressive for the smaller cells found in mobility units, leading to internal heat damage and venting. To understand the limits of these systems, read our expert advice on can you overcharge a mobility scooter battery to ensure you aren't inadvertently causing cell damage through improper charger use.
When to Consider Uprating Capacity
If your daily travel requirements exceed the standard range of your equipment, uprating the capacity is a viable technical solution. For many smaller scooters, fitting a 12v 9ah uprated battery provides significantly more energy than a standard 7Ah unit within the same physical footprint. This allows for an extended travel range without requiring modifications to the battery tray or housing. Before committing to an upgrade, consult our technical guide to uprating to verify compatibility with your motor controller and wiring loom. Ensure your existing charger is capable of handling the increased Amp-hour rating; a charger with too low an output may take excessively long to reach a full state of charge, which can negatively impact the battery's health over time. Following these steps ensures that fitting new batteries to mobility scooter units results in the maximum possible return on your investment.
Restoring Your Scooter's Performance and Reliability
Successful installation requires technical precision and a methodical approach to electrical safety. By accurately identifying terminal types and adhering to correct series wiring protocols, you ensure the long-term stability of your equipment. Two critical takeaways for fitting new batteries to mobility scooter units involve verifying snug terminal fits to prevent arcing and allowing for a complete 12-14 hour initial charge cycle. These steps are essential for conditioning the internal chemistry of your new power source and achieving the maximum possible service life.
As an official stockist, we provide high-performance units featuring deep-cycle AGM technology for maximum range. If you require assistance with technical specifications or compatibility, our UK-based expert technical support is available to guide your selection. Browse our range of premium Lucas Mobility Batteries for fast UK delivery and restore your equipment to its full potential. With the correct installation and a disciplined charging routine, you can enjoy dependable power and the peace of mind that comes with a professionally maintained system.
Frequently Asked Questions
Do I need to charge new mobility scooter batteries before fitting them?
You must charge your new batteries for a full 12 to 14 hours before their first use. Whilst Lucas AGM units are dispatched in a stable state, they typically sit at approximately 80% capacity upon delivery. This initial uninterrupted charge is vital for conditioning the internal lead plates and ensuring the longevity of the cells. Skipping this step can lead to a permanent reduction in the battery's total service life.
Can I replace just one battery if the other one is still working fine?
No, you should always replace mobility scooter batteries in matched pairs from the same production batch. If you install a single new unit alongside an older one, the newer battery will constantly attempt to "charge" the weaker cell. This imbalance creates excessive heat and causes the new battery to degrade rapidly. For consistent performance, always install two identical Lucas deep-cycle units simultaneously.
What happens if I connect the positive and negative wires the wrong way round?
Connecting wires to the incorrect terminals causes an immediate short circuit that can blow the main fuse or trip the circuit breaker. In more severe instances, reversed polarity can permanently destroy the scooter's electronic controller or cause an electrical fire. When fitting new batteries to mobility scooter models, always double-check that the red lead is on the positive (+) terminal and the black lead is on the negative (-) terminal.
How tight should the terminal screws be when fitting new batteries?
Terminal fasteners should be tightened until they are firm and immovable, but you must avoid using excessive force. Over-tightening can strip the soft lead threads found on many battery terminals, rendering the unit unusable. Conversely, loose connections create high electrical resistance. This resistance generates heat that can melt the plastic battery casing or the wiring harness connectors during operation.
Why does my scooter feel slower even though I have just fitted new batteries?
New AGM batteries require a "breaking-in" period of 10 to 15 full charge and discharge cycles before they reach their maximum power output. If the scooter feels sluggish immediately after fitting new batteries to mobility scooter hardware, it is likely because the internal chemistry has not yet reached peak efficiency. If the issue persists after 15 cycles, inspect the wiring for loose connections or verify that the motor's freewheel lever is fully engaged.
Is it safe to fit higher capacity batteries than the ones I am replacing?
It is safe to uprate your batteries as long as they fit within the physical dimensions of the battery tray and are the correct 12V voltage. For example, replacing a 7Ah battery with a 9Ah unit is a common upgrade that provides a longer travel range. You must ensure your charger is compatible with the higher Amp-hour rating to avoid excessively long charging times that could stress the charger's components.
How do I dispose of my old mobility scooter batteries after fitting the new ones?
You should take old lead-acid or AGM batteries to a local household waste recycling centre or a specialist battery retailer. Under the UK Waste Battery Regulations, any retailer selling more than 32kg of portable batteries per year is legally required to offer a free take-back scheme. These units contain lead and sulphuric acid, so they must be recycled professionally to prevent environmental contamination.
Can I fit the batteries myself, or do I need a professional engineer?
Most users can fit the batteries themselves by following a technical guide and using basic hand tools. The process involves lifting heavy units and managing simple electrical connections. However, if you have limited hand strength, difficulty lifting 5kg to 30kg, or feel unsure about identifying wiring polarities, you should contact a professional. Correct installation is essential for both your safety and the scooter's reliability.