
How to Test a Mobility Scooter Battery: A Comprehensive Technical Guide
What if that full green light on your dashboard is actually lying to you about your scooter's true remaining range? Understanding how to test a mobility scooter battery is essential when your equipment feels sluggish on inclines or fails to hold a charge overnight. You rely on your scooter for independence, so a sudden loss of power isn't just an inconvenience; it's a significant risk to your daily mobility.
This guide provides the exact professional methods required to diagnose your power cells, moving beyond basic dashboard indicators to provide a definitive health check. You'll learn how to interpret precise multimeter voltage readings and conduct real-world load tests to identify internal resistance issues. We will break down the technical data so you can determine with absolute certainty whether your current setup is healthy or if it's time to install a new pair of high-performance Lucas AGM batteries to restore your scooter's range and reliability.
Key Takeaways
- Perform a complete 12-hour charge cycle followed by a six-hour resting period to ensure your diagnostic readings are stable and accurate.
- Discover how to test a mobility scooter battery using a digital multimeter to identify the precise DC voltage of each 12V cell.
- Learn to conduct a real-world load test whilst the scooter is in use to detect voltage drops that static testing might miss.
- Identify whether your power issues stem from the batteries or the charging unit by interpreting manufacturer flash codes and charger output.
- Understand why replacing batteries in balanced pairs is essential for system longevity and how to correctly match Amp Hour (Ah) specifications.
Initial Assessment and the Battery Meter Test
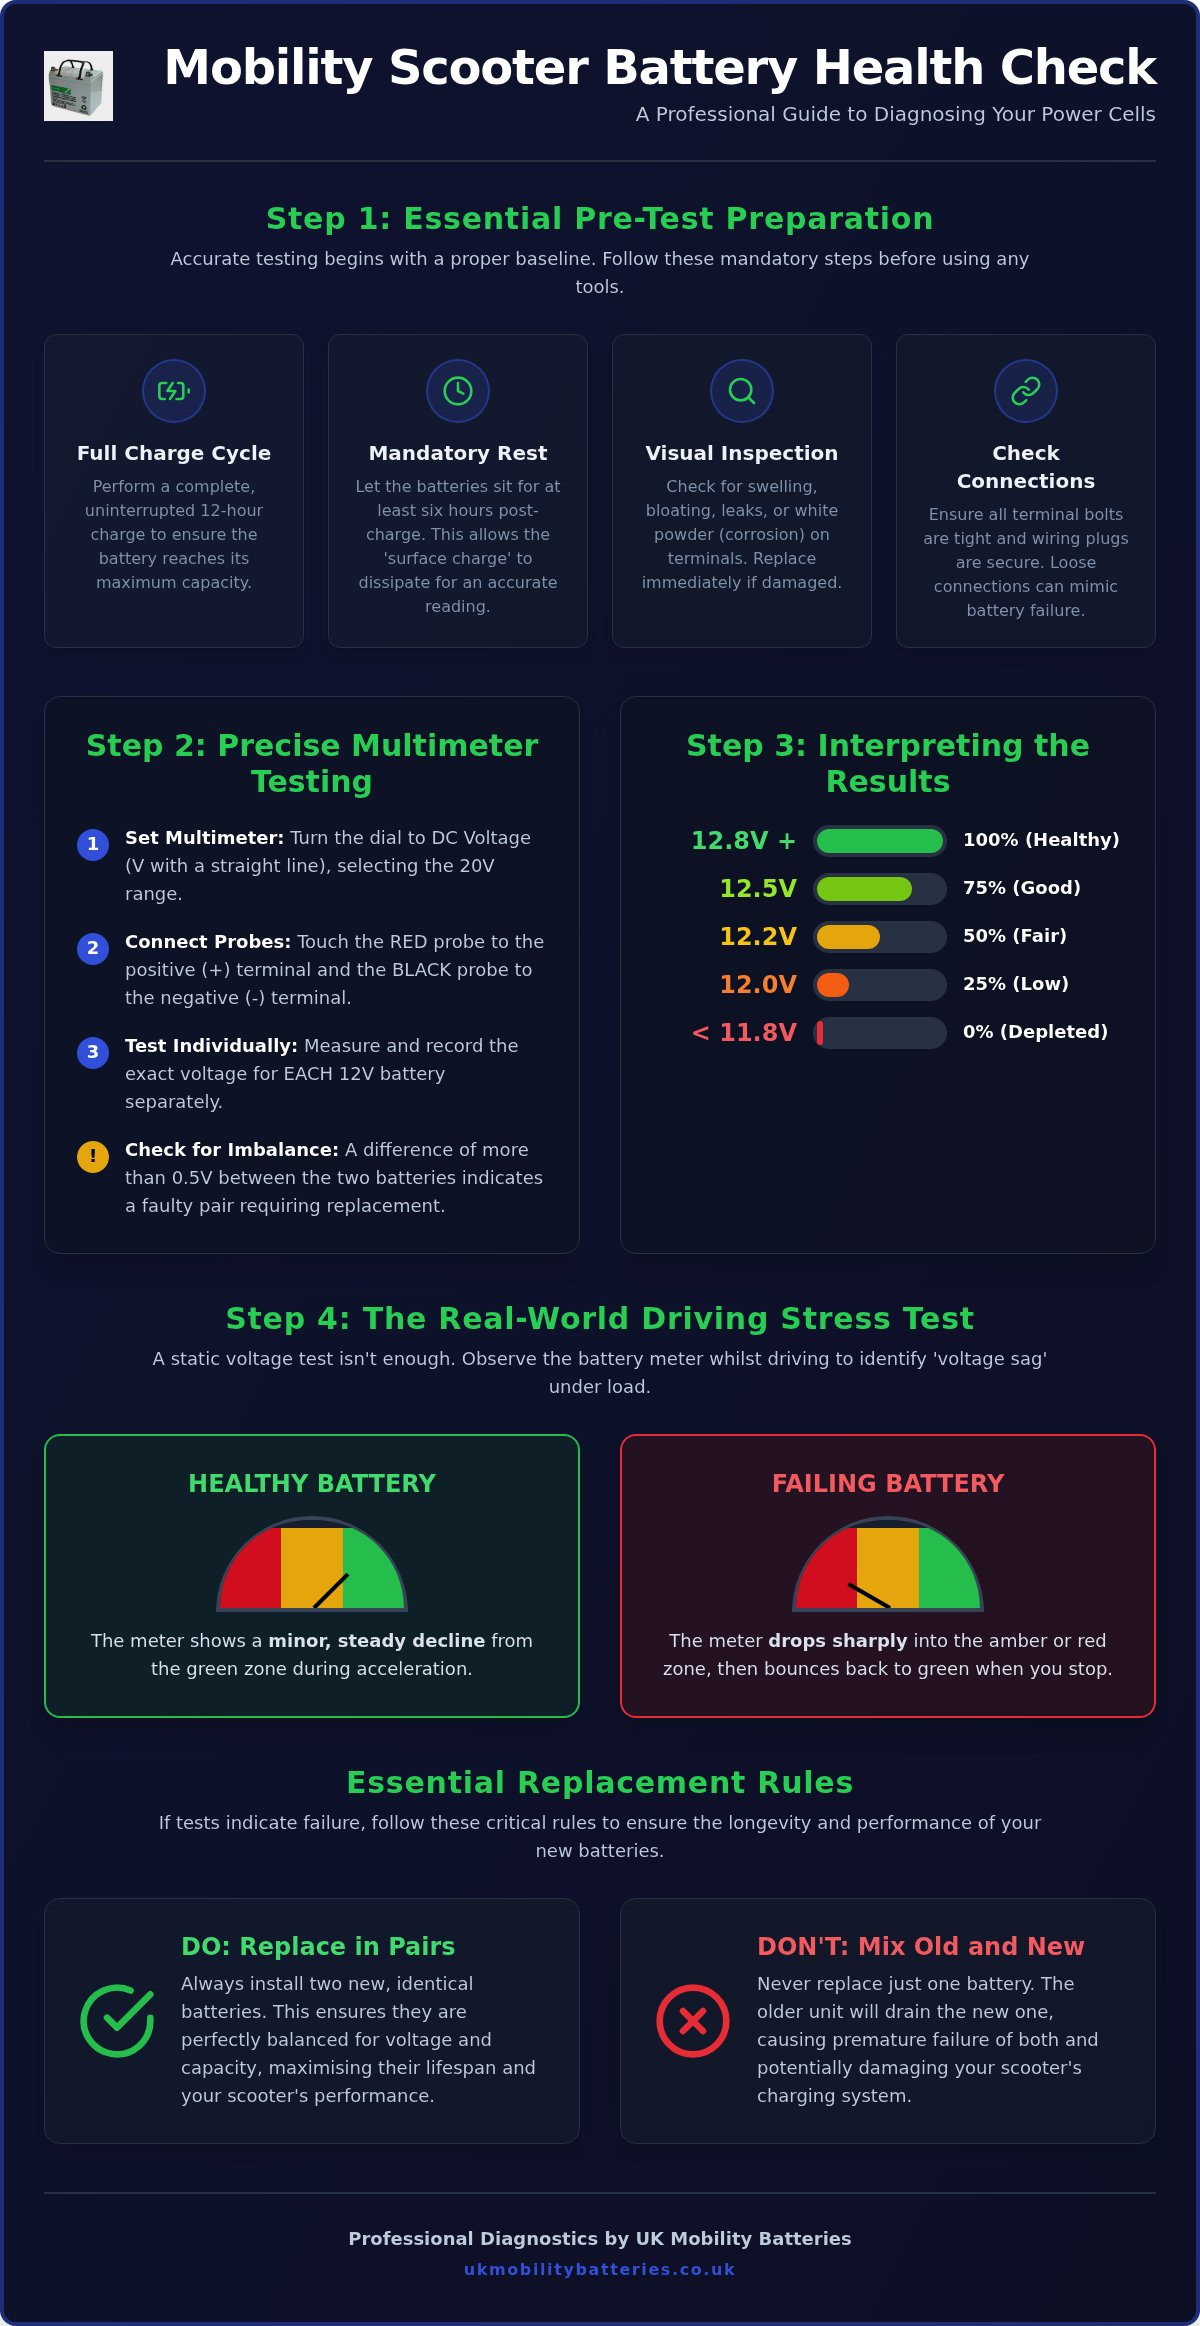
Before investigating how to test a mobility scooter battery with complex tools, you must establish a technical baseline. Every diagnostic procedure begins with a mandatory 12-hour charge cycle. Testing a battery that hasn't reached its peak capacity will produce unreliable data. Most modern mobility aids utilise VRLA battery technology, which requires specific charging profiles to maintain health. Once the charger indicates a full cycle is complete, leave the scooter for at least one hour to allow the surface charge to dissipate.
Conduct a thorough visual inspection of the battery casing and housing before proceeding. Look for signs of swelling or bloating, which typically indicates the battery has been overcharged or subjected to excessive heat. Check for liquid leaks or white, powdery oxidation around the terminals. Corrosion at these points increases electrical resistance, which causes the scooter to perform poorly even if the internal cells are technically healthy. If you spot physical damage, the batteries should be replaced immediately.
Your dashboard meter provides the first clue about battery health, though it requires careful interpretation. LED bar displays and analogue needles both show current voltage, but they can be deceptive. An aged battery often shows a full status whilst the scooter is stationary. This occurs because the battery can maintain a high resting voltage despite having lost its ability to deliver current under pressure. You cannot rely on a static meter reading to confirm battery health.
The Driving Stress Test
Observe the meter's behaviour whilst driving on a flat, clear surface. Apply full throttle and watch the indicator closely to identify voltage sag. If the meter immediately drops from the green zone into the amber or red zone during acceleration, the internal resistance of the battery is too high. A healthy battery should only show a minor, steady decline. If the needle or LED bars bounce back to full the moment you stop, the cells are likely depleted and cannot sustain a continuous load.
Checking Physical Connections
Faulty wiring often mimics the symptoms of battery failure. Ensure all terminal bolts are tight; loose connections cause intermittent power loss and dangerous heat build-up. Examine the main wiring loom and the plastic plug connectors for signs of melting or scorched pins. Always wear protective gloves when handling batteries and use insulated tools to prevent accidental short circuits. Verifying these physical elements is a crucial step in how to test a mobility scooter battery properly, as it ensures you're measuring the actual cell performance rather than a poor connection.
Using a Multimeter for Precise Voltage Testing
Using a digital multimeter provides the most accurate data when you need to know how to test a mobility scooter battery. To begin, set your multimeter to the DC voltage range. On most devices, this is indicated by a "V" with a straight line over it. Select the 20V setting for testing individual batteries or the 200V setting if you're measuring the combined 24V output via the charging port. A common mistake is testing the batteries immediately after they've been on charge. This results in a false high reading called "surface charge".
To obtain a reliable measurement, you must follow the "Resting Period" rule. Allow the batteries to sit for at least six hours after the charger has been disconnected. If you need results faster, you can remove the surface charge by turning on the scooter's lights or driving it for 30 seconds. Once the voltage has stabilised, you'll get a true reflection of the battery's chemical state. If your readings consistently fall below the 12V mark during this phase, it's likely time to browse our range of replacement Lucas mobility batteries to restore your equipment's reliability.
Step-by-Step Multimeter Connection
Safe access is the first priority. Refer to our how to change mobility scooter batteries guide for instructions on opening your specific battery case. Once exposed, touch the red probe to the positive (+) terminal and the black probe to the negative (-) terminal. Record the exact voltage for each battery separately. In a 24V system, both 12V batteries should show nearly identical numbers. A difference of more than 0.5V between the two units suggests an unbalanced pair, which often leads to premature failure of the "stronger" battery.
Voltage vs. Capacity Reference Chart
Interpreting the numbers on your screen is just as important as the physical test. Professionals use specific voltage thresholds to determine the state of charge in AGM cells. This how to test a mobility scooter battery resource confirms that a "12V" battery isn't actually 12.0V when full. Use the table below to evaluate your results.
| Voltage (12V AGM) | Approximate Charge Level |
|---|---|
| 12.7V - 12.9V | 100% (Healthy) |
| 12.5V | 75% |
| 12.2V | 50% (Recharge Recommended) |
| 10.5V or lower | 0% (Discharged or Dead Cell) |
A reading of 10.5V or lower usually indicates a "dead cell". This is a permanent chemical failure that cannot be fixed by charging. If one battery reads 12.7V whilst the other sits at 10.5V, the lower battery has failed and the entire pair must be replaced to maintain system balance.
Conducting a Real-World Load Test
Static voltage readings are a useful starting point, but they don't tell the whole story. A battery can show a healthy 12.7V whilst stationary yet fail completely the moment you engage the motor. This happens because the internal chemistry can no longer support a high current draw, a condition known as high internal resistance. To truly understand how to test a mobility scooter battery, you must observe its performance under load.
The "In-Situ" method uses the scooter's own drivetrain as a diagnostic tool. By monitoring the dashboard meter whilst the motor is working, you can see how the voltage responds to real-world stress. A healthy battery will experience a slight, controlled dip in voltage before stabilising. A failing battery will drop precipitously, often triggering the scooter's low-voltage cut-off. This drop is usually most visible when the scooter is first set in motion or when navigating difficult terrain.
The Incline Test
Find a safe, gentle slope to perform a stress test. Accelerate from a standing start up the incline. This requires maximum torque from the motor and places the highest possible demand on your power cells. If the scooter feels sluggish or the speed drops significantly despite being on a full charge, the batteries are struggling to deliver the required amperage. Watch for the scooter "resetting" or cutting out entirely; this is a clear sign that the voltage has sagged below the controller's operational limit.
The "Recovery Rate" is equally important. Once you stop the scooter on flat ground, observe how quickly the battery meter returns to its previous position. A healthy set of batteries will recover almost instantly. If the meter stays in the red or amber zone for several minutes after the load is removed, the cells are chemically exhausted and can no longer maintain their charge.
Professional Load Testing Tools
Whilst the incline test is effective, professional engineers often use a carbon pile or digital load tester for absolute precision. These handheld devices apply a specific, timed electrical load to the battery, simulating the exact drain of a scooter motor. They measure the battery's ability to maintain a steady voltage under a high-amp draw. Using these specialised instruments is the most technical way to approach how to test a mobility scooter battery, providing a definitive pass or fail result based on the battery's capacity.
If you find that your current cells fail these tests, replacing them with a pair of high-performance Lucas AGM batteries is the most reliable way to ensure your scooter is fit for purpose. These professional tools remove the guesswork, ensuring you don't replace a functional charger when the batteries are the actual cause of the power loss.
Troubleshooting: Is it the Battery or the Charger?
Differentiating between a failed battery and a faulty charger is a critical step in how to test a mobility scooter battery. Many owners purchase new cells only to find the issue persists because the charging unit is defective. If your batteries show a low voltage reading that never increases after a 12-hour cycle, the charger is the primary suspect. Conversely, if the charger indicates a full charge within minutes, the batteries likely have no remaining capacity to hold energy. You must determine which component has failed to avoid unnecessary expenses.
Charger Diagnostic Steps
Begin by checking the charger fuse and the mains lead for physical damage or loose pins. A functioning charger should become slightly warm to the touch during the "Bulk" stage of the 3-stage charging process. If it remains cold, it isn't transferring current. You can verify this by testing the charger's output pins with a multimeter. A standard 24V charger should output between 27V and 29V. Most units also use "Flash Codes" to communicate errors. A rapidly blinking red or amber light often indicates a "Timeout Error". This means the charger has been running for too long without the battery voltage reaching the "Absorption" or "Float" thresholds. A single flash followed by a pause usually indicates a connection fault, whilst a double flash can signal that the battery voltage is too low for the charger to initiate the cycle.
Signs of Irreparable Battery Damage
Identifying permanent failure is as important as knowing how to test a mobility scooter battery for temporary issues. Sulfation occurs when batteries are left in a discharged state, particularly amongst the cold winter months. This chemical reaction creates lead sulphate crystals that permanently reduce capacity. If a battery becomes excessively hot or emits a "rotten egg" smell during charging, it has an internal short circuit. These are unfixable conditions. For more detailed help on categorising these faults, consult our mobility scooter battery troubleshooting guide.
A "dried out" AGM battery often shows high voltage but zero current. This happens when the internal electrolyte mat loses moisture over several years. If your diagnostic tests confirm the charger is functional but the scooter still lacks range, it's time to upgrade to dependable Lucas mobility batteries to ensure your safety and continued independence.
Selecting Replacement Lucas AGM Batteries
Once you have completed the diagnostic steps on how to test a mobility scooter battery and identified a terminal fault, selecting the correct replacement is the final step in restoring your scooter's performance. You must always replace mobility batteries in pairs. Because scooters operate on a 24V system using two 12V batteries in series, mixing a new unit with an aged one creates a voltage imbalance. The new battery will work harder to compensate for the resistance in the weaker one, leading to rapid degradation of both cells within months.
Choosing Lucas Sealed AGM technology ensures a maintenance-free power solution. These batteries are designed specifically for deep-cycle applications, meaning they can handle repeated discharge and recharge cycles without the performance loss associated with standard starter batteries. They are spill-proof and safe for air travel, provided you obtain airline approval, ensuring a dependable energy source for high-use equipment.
Choosing the Right Capacity
When selecting a replacement, you must match or exceed the original Amp Hour (Ah) rating. For example, if your tray currently holds Lucas 12V 34Ah Sealed AGM Deep Cycle Batteries, you may be able to upgrade to Lucas 12V 50Ah Mobility Batteries to increase your range. A higher Ah rating provides more energy storage within the same physical footprint in many cases. Upgrading from a standard Lucas 12V 7Ah Sealed AGM Battery to a Lucas 12V 9Ah Uprated Sealed AGM Battery provides approximately 28% more capacity. However, you must verify the physical dimensions of the battery tray before ordering. Consult the Ultimate Guide to Mobility Scooter Batteries UK for detailed size charts and capacity matching advice.
Environmental responsibility is a legal requirement in the UK. Lead-acid batteries are classified as hazardous waste and must not be disposed of in general household bins. Under the Waste Batteries and Accumulators Regulations, these units should be taken to a dedicated recycling area at your local authority recycling site. This ensures the lead and plastic components are processed safely whilst preventing soil contamination.
Ordering from UK Mobility Batteries
UK Mobility Batteries provides specialist technical support to help you identify the exact power cell required for your wheelchair or scooter. We offer fast national delivery across the UK, ensuring you regain your independence quickly. Whether you need a compact Lucas 12V 12Ah Mobility Battery or a high-capacity Lucas 12V 55Ah Sealed AGM Mobility Batteries, our inventory is focused on technical reliability. Browse our range of Lucas Mobility Batteries today to find a compatible, high-performance pair for your equipment.
Restoring Your Scooter's Reliability and Range
Mastering how to test a mobility scooter battery allows you to distinguish between simple charging faults and permanent cell failure. By combining precise multimeter readings with real-world load testing, you can make informed decisions about your equipment's maintenance. Remember that voltage alone doesn't guarantee performance; your batteries must sustain power whilst navigating inclines and varied terrain to ensure your safety and independence.
If your diagnostic results confirm that your current power cells have reached the end of their service life, replacing them with a balanced pair is essential. As an official Lucas battery stockist, we provide a specialist AGM deep cycle range designed for durability and consistent performance. We offer free technical support for UK customers to assist with capacity matching and technical specifications. Don't let a failing battery limit your mobility. Find your replacement Lucas mobility batteries here and enjoy the confidence of a professionally tested power system.
Frequently Asked Questions
Can I test my mobility scooter battery with a standard car battery tester?
No, you should not use a standard automotive battery tester for AGM mobility batteries. Car testers are designed to measure cold cranking amps (CCA) by applying a massive, short-term current draw. This process can damage the thinner, deep-cycle plates inside a mobility battery. Instead, use a digital multimeter or a specialised low-amp load tester specifically calibrated for VRLA and AGM cells to ensure accurate data without risking internal damage.
How many volts should a 24V mobility scooter battery pack read when full?
A fully charged and rested 24V battery pack should read between 25.4V and 25.8V. Because the system consists of two 12V batteries connected in series, each individual battery should measure between 12.7V and 12.9V. If your total pack reading is exactly 24.0V, the batteries are actually discharged to approximately 50% capacity. Any reading lower than this indicates the pack requires an immediate 12-hour charge cycle to prevent permanent sulfation.
Why does my battery meter drop to red when I go up a hill?
This occurs due to a phenomenon called voltage sag, which happens when the motor demands maximum current to overcome gravity. Whilst a small dip is normal, a drop into the red zone suggests the batteries have high internal resistance. This means the chemical plates can no longer deliver high amperage quickly. If the meter fails to recover instantly once you reach flat ground, the batteries are likely chemically exhausted and require replacement.
Can I test my batteries without taking the scooter apart?
You can conduct a preliminary check via the 3-pin charging port without dismantling the chassis. By using a multimeter on the DC setting, you can measure the combined 24V output of the pack. However, this method only provides a total system reading. If you need to know how to test a mobility scooter battery with absolute precision, you must eventually access the individual 12V cells to identify an unbalanced or failing unit.
How do I know if my mobility scooter charger is working correctly?
To verify your charger's performance, measure the voltage at the battery terminals whilst the charger is active. A functional unit will raise the battery voltage to between 28V and 29V during the absorption stage of the cycle. If the voltage remains at the resting level, such as 24.5V, despite the charger being plugged in, the unit is likely faulty. You should also check the charger's internal fuse and the mains lead for damage.
Is it possible to revive a mobility scooter battery that has sat empty for months?
Reviving a battery that has sat empty for months is usually impossible. When a lead-acid battery remains discharged, lead sulphate crystals harden on the internal plates. This permanent sulfation prevents the battery from accepting a charge or delivering current. Even if a specialist charger managed to "force" a charge into the cells, the battery's original capacity and reliability would be significantly compromised, making it unsafe for regular use on public pavements.
How often should I perform a health check on my batteries?
We recommend performing a technical health check every six months to track performance trends. Regular monitoring allows you to spot gradual capacity loss or terminal oxidation before they cause a breakdown. If you use your scooter daily, more frequent checks are beneficial. Learning how to test a mobility scooter battery as part of a routine maintenance schedule ensures you aren't surprised by a sudden loss of range during an essential journey.
What is the minimum voltage a mobility battery can have before it is considered dead?
A 12V mobility battery is technically fully discharged at 10.5V. If your multimeter shows a reading at or below this level after a resting period, the battery is considered dead. Discharging a battery further, into the 0V to 10V range, often causes cell reversal or severe internal damage. If one battery in your pair reads 12.7V whilst the other sits at 10.5V, the lower battery has failed and the entire pair must be replaced.