
Tools Needed to Change Wheelchair Batteries: The Complete UK Checklist
A single misplaced metal spanner can instantly release hundreds of amps, potentially welding the tool to your wheelchair frame or causing a dangerous short circuit. It is a common concern for many UK powerchair users who want to avoid expensive technician fees but fear damaging their equipment. Understanding the exact tools needed to change wheelchair batteries is the first step toward a successful DIY replacement. Most modern UK wheelchairs operate on a 24-volt system using two 12V Lucas AGM batteries; however, the physical task of swapping them requires precision to avoid stripping soft lead threads or causing electrical arcs.
You might worry about whether your garage tools are the correct metric sizes or how to handle heavy 25kg units safely. We have compiled this checklist to give you total confidence in the process. You will discover exactly which 8mm, 10mm, and 13mm tools are required, how to sequence your terminal connections to prevent sparks, and why a simple tub of petroleum jelly is essential for long-term reliability. By following this technical breakdown, you can ensure your new batteries are installed to professional standards without the risk of housing damage or electrical faults.
Key Takeaways
- Secure the wheelchair on a level surface and isolate the power supply to ensure a stable, safe environment for mechanical work.
- Identify the specific metric socket sizes-typically 10mm or 13mm-required to manage terminal bolts, as these are the core tools needed to change wheelchair batteries.
- Prevent future power loss by removing existing oxidation with a wire brush and applying a protective layer of petroleum jelly to the new terminals.
- Master the safe disconnection sequence by detaching the negative (black) terminal first, whilst using a spanner to hold the nut steady against the bolt.
- Optimise performance by fitting matched Lucas 12V AGM units, which provide a reliable, maintenance-free power solution for UK mobility equipment.
Preparation and Safety: What to Know Before You Start
Proper preparation reduces the risk of electrical arcing and mechanical errors. Before gathering the tools needed to change wheelchair batteries, you must secure the vehicle. Park the wheelchair on a level, hard floor. Engaged brakes are non-negotiable; a shifting chair can lead to trapped fingers or damaged wiring harnesses. You should also locate the main power isolation switch or remove the joystick controller to ensure the system is completely inert whilst you work.
Ensure the workspace is brightly lit. Small M5 or M6 terminal bolts are easily lost in shadows or thick carpet. Using a magnetic tray or a simple plastic container to hold fasteners prevents frustrating delays. Wear rubber-soled shoes to provide insulation from the ground. Sturdy work gloves protect against sharp edges on the battery shroud and potential lead-oxide residue found on old, weathered terminals.
Identifying Your Wheelchair Battery Type
Most UK electric wheelchairs operate on a 24-volt system created by two 12V batteries wired in series. You must distinguish between sealed AGM and Gel technologies before ordering replacements. Check the label on your existing Lucas battery for the Amp Hour (Ah) rating. Common capacities include the 12V 12Ah mobility battery for travel chairs or the 12V 55Ah sealed AGM units for larger powerchairs. You must always replace these batteries in matched pairs. Installing a single new battery alongside an old one causes the higher resistance in the aged cell to degrade the new unit within weeks.
Essential Electrical Safety Precautions
Short circuits are the primary danger during the replacement process. A strict "no metal-to-metal" rule applies; never allow a metal tool to bridge the gap between the positive and negative terminals. Remove all jewellery before starting. Rings and metal watch straps can act as high-current conductors if they accidentally touch a live terminal, leading to severe burns.
Proper handling techniques are vital because deep-cycle batteries are deceptively heavy. A matched pair of 50Ah batteries can weigh approximately 30kg. Use the integrated carrying handles or a specialised battery strap to lower the units into the housing. This prevents impact damage to the wheelchair casing and reduces the risk of back strain. Always verify the terminal orientation matches your original configuration before you begin the final connection process.
The Essential Tool Kit for Wheelchair Battery Replacement
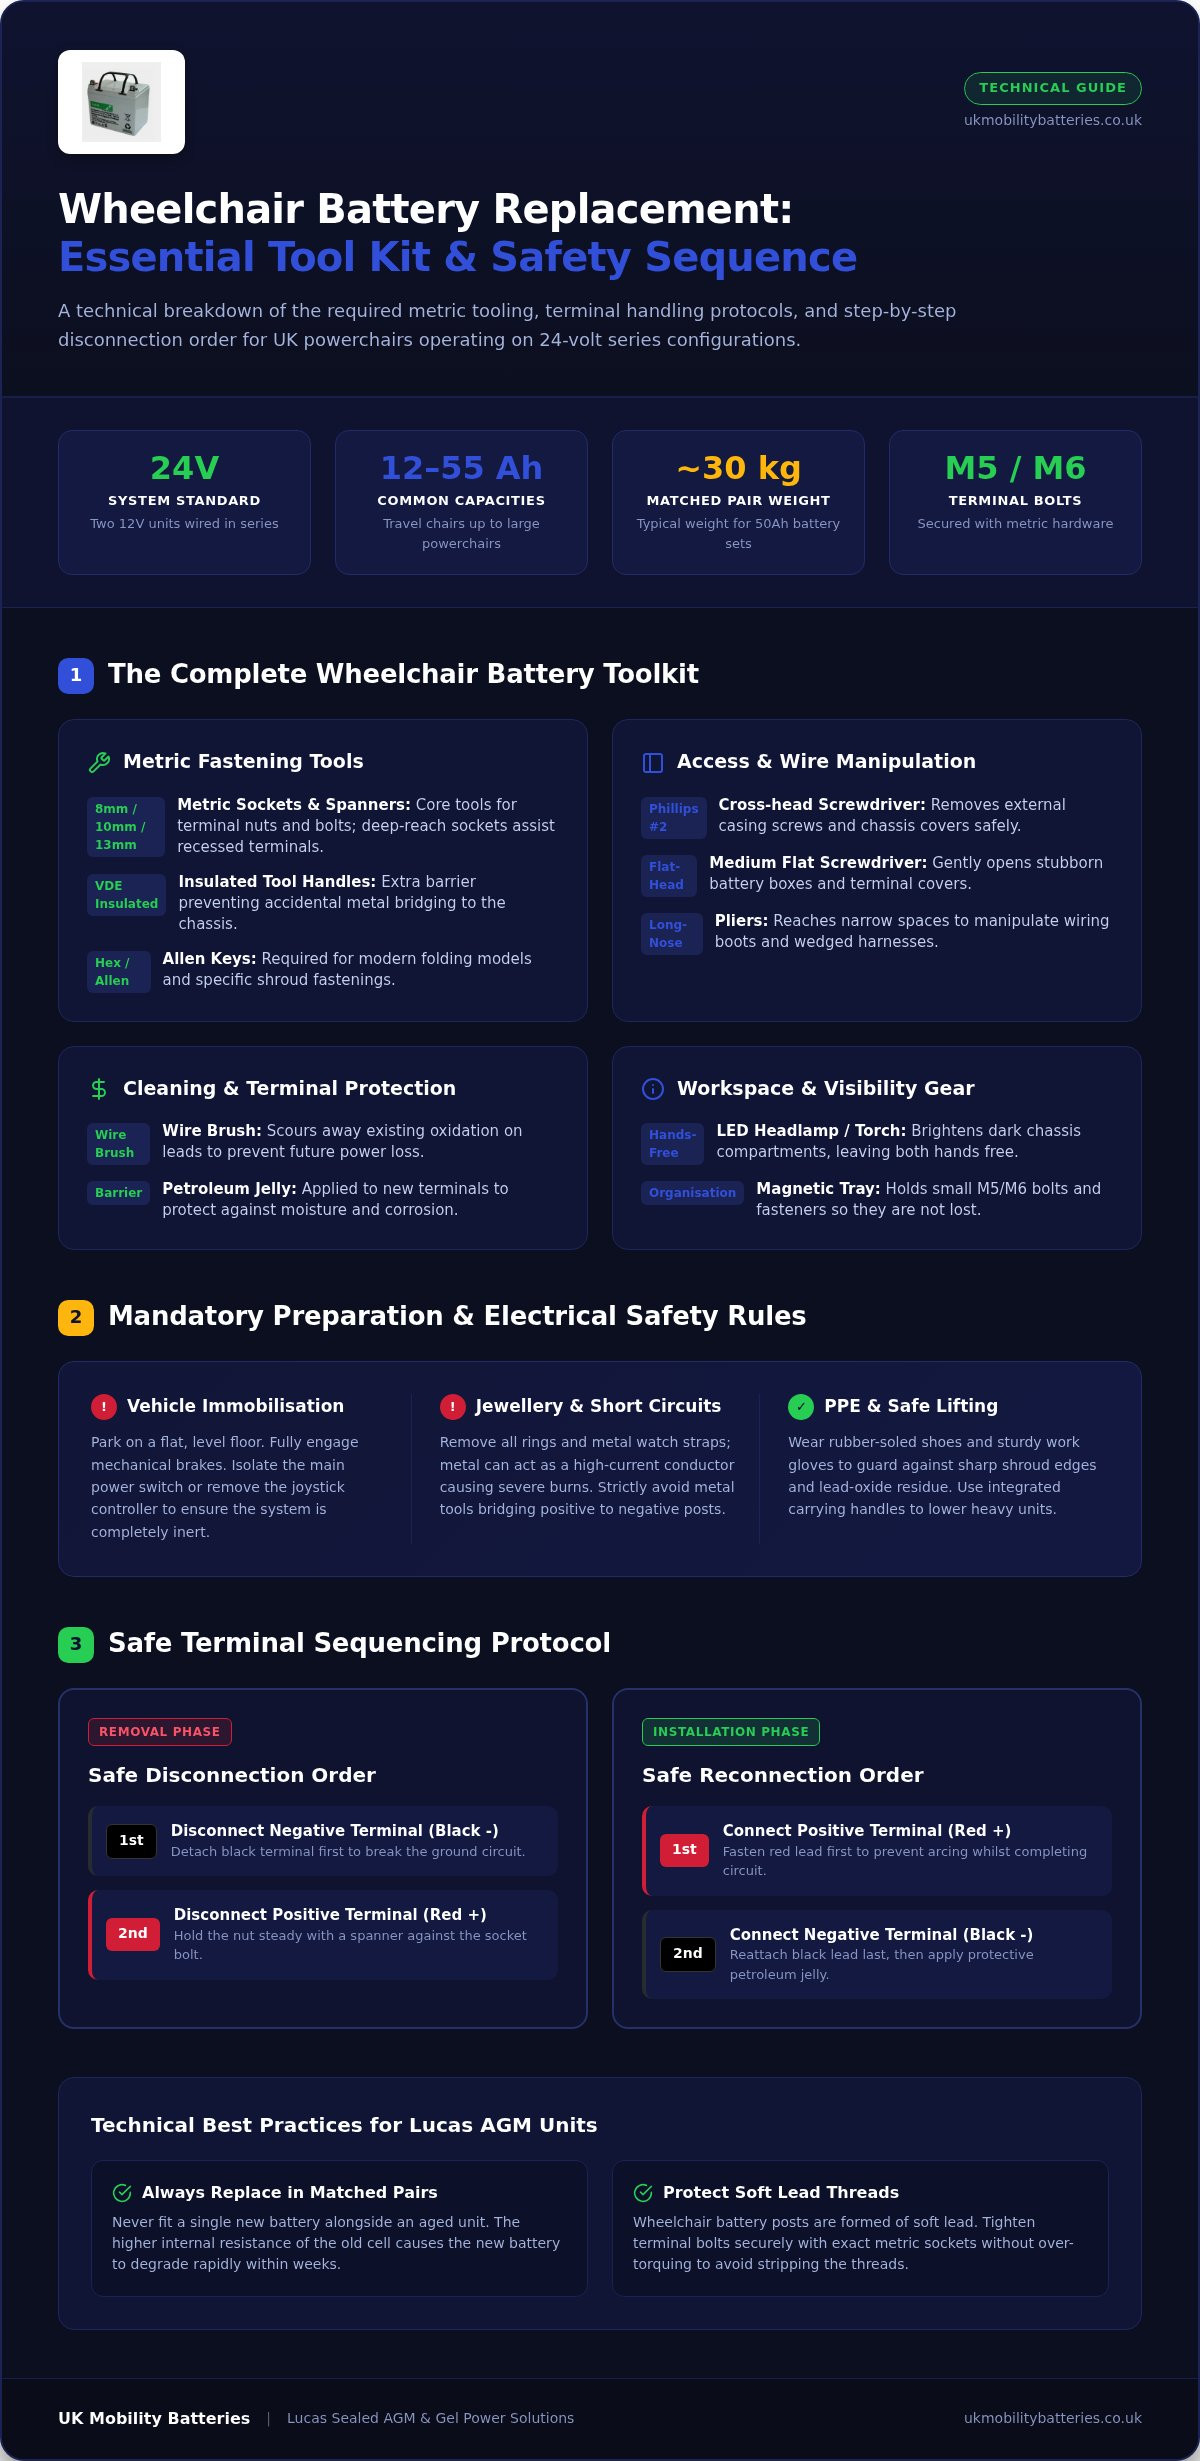
Having the correct tools needed to change wheelchair batteries ensures the job is completed without damaging the battery posts or the wheelchair shroud. You will primarily need a set of metric sockets or an adjustable spanner. Most UK mobility manufacturers use 10mm or 13mm bolts for the battery terminals. A cross-head (Phillips) screwdriver is usually required to remove the external casing screws; a flat-head version helps in prying open stubborn battery boxes or prying up terminal covers.
Visibility is often the biggest hurdle during this process. Battery compartments are frequently tucked away beneath the seat or within a dark plastic chassis. A small LED torch or a headlamp is invaluable here. It leaves both hands free to manipulate the heavy cables. Long-nose pliers are also essential for reaching into narrow gaps to adjust terminal boots or to pull through wiring harnesses that have become wedged. A basic kit should include:
- 10mm and 13mm metric sockets or spanners for terminal bolts.
- Phillips #2 and medium flat-head screwdrivers for casing and shrouds.
- Long-nose pliers for manipulating wires and plastic covers.
- LED headlamp or compact torch for internal compartment visibility.
Hand Tools for Terminal Connections
A socket set is often superior to a standard spanner because it provides better leverage in confined spaces. Deep-reach sockets are particularly useful for terminal bolts that sit recessed within the battery casing. Always check if your wheelchair frame requires Allen (hex) keys; some modern folding models use these for the main shroud fasteners. If possible, use tools with VDE-certified insulated handles. These provide an extra layer of protection against accidental short circuits if the tool touches both a terminal and the metal chassis simultaneously.
Accessing the Battery Compartment
UK mobility equipment often uses a mix of Phillips #2 screws and plastic push-fit clips. Be gentle with plastic shrouds; they can become brittle over time and snap if forced. If a panel feels stuck, check for hidden screws beneath reflectors or Velcro patches. Organising these fasteners is critical. A magnetic tray ensures that small washers and bolts do not roll away during the swap. Once you have successfully accessed the compartment and removed the old units, you can browse the range of Lucas mobility batteries to find the exact Ah rating required for your specific model.
Cleaning and Protecting: Tools for a Professional Finish
Completing the mechanical swap is only part of the process. To ensure the longevity of your new Lucas batteries, you must address terminal hygiene and environmental protection. Whilst the primary tools needed to change wheelchair batteries involve spanners and screwdrivers, the finishing phase requires specific cleaning supplies to prevent high-resistance connections. Neglecting this stage often leads to premature failure or intermittent power loss due to poor electrical contact.
A wire battery terminal brush or fine emery paper is essential for removing lead-oxide glazing from the wheelchair's ring terminals. This glazing acts as an insulator, restricting current flow even if the bolts are tight. Use a clean, lint-free microfibre cloth to wipe down the battery tray and the internal housing. Removing grit and old acid residue prevents the battery casings from vibrating against debris, which can cause structural wear over time.
Terminal Maintenance and Corrosion Prevention
Old terminals often exhibit "white powder" corrosion, which is a sign of lead sulphate buildup or minor acid venting from the previous units. This must be neutralised and scrubbed away before fitting the new batteries. Once the connections are tightened, apply a thin layer of petroleum jelly (Vaseline) or a specialist dielectric grease over the entire terminal assembly. This creates an airtight seal that prevents oxygen and moisture from reaching the metal, effectively stopping future oxidation. For a deeper understanding of identifying these issues, refer to our guide on mobility scooter battery troubleshooting.
Testing Tools for Peace of Mind
A digital multimeter is highly recommended for verifying the health of your installation. A multimeter is a device used to measure electrical voltage and current. Before connecting the batteries to the wheelchair's main harness, use the multimeter to check that each 12V unit shows a resting voltage of at least 12.6V. This confirms they are fully charged and ready for service.
You can also use the multimeter to check the continuity of the wheelchair wiring loom. This ensures there are no hidden breaks in the cables or blown inline fuses that might prevent the chair from powering up. Verifying these data points before you replace the heavy plastic shrouds saves significant time and effort. It provides the technical certainty that your equipment is operating within the manufacturer's specified electrical parameters.
Step-by-Step Tool Application Guide
Applying the mechanical knowledge from previous sections requires a methodical approach. When using the tools needed to change wheelchair batteries, the sequence of operations is as critical as the tools themselves. Start by identifying the negative terminal, usually marked with a black cover or a minus (-) symbol. Using your 10mm or 13mm spanner, loosen this connection first. This safety protocol ensures that if your tool accidentally touches the metal chassis whilst loosening the bolt, no electrical circuit is completed, preventing dangerous sparks or damage to the onboard electronics.
Once the negative leads are clear, repeat the process for the positive (red) terminals. If the bolts are stubborn, apply a small amount of penetrating oil and allow it to sit for five minutes before attempting to turn them again. Most Lucas batteries feature integrated lifting handles; use these to pull the old units vertically out of the tray. This prevents the heavy casings from dragging across the wheelchair's wiring loom or internal sensors.
Removing the Old Batteries Safely
The correct sequence for removing terminal wires is essential for protecting the wheelchair's control module. Always detach the black cables before the red ones. If you encounter seized bolts, do not force them, as the lead terminal posts can snap under excessive torque. For visual cues on handling specific harness configurations, you can refer to our how to change mobility scooter batteries guide. Once the cables are free, tuck them aside to ensure a clear path for lifting the heavy deep-cycle units out of the chassis.
Installing and Securing New Lucas Batteries
Position your new Lucas 12V AGM batteries into the tray, ensuring the terminals are orientated exactly as the previous set. During installation, reverse the disconnection sequence: connect the positive (red) terminal first, followed by the negative. Tighten the bolts until they are firm. You don't need to over-tighten; approximately 5Nm to 6Nm of torque is sufficient to ensure a solid electrical connection without stripping the soft lead threads. Before replacing the battery shroud, check that no cables are trapped or pinched against the frame. Tucking the wiring neatly ensures that vibration during use won't cause the insulation to rub thin over time.
Once your tools are packed away and the shroud is secure, your wheelchair is ready for its initial charge cycle. To ensure you have the correct power source for your model, buy replacement Lucas batteries from our specialist range today.
Choosing the Right Replacement Batteries from UK Mobility Batteries
Identifying the correct power source is as vital as gathering the tools needed to change wheelchair batteries. Lucas 12V AGM batteries are engineered specifically for deep-cycle applications, providing the cyclic performance required for daily mobility use. Unlike standard automotive batteries, these specialised units handle frequent discharge and recharge cycles without rapid capacity loss. You must verify the terminal configuration before purchase. Most modern UK powerchairs use internal threaded insert terminals, typically M5 or M6, whilst older or heavy-duty models might require flag-type terminals. Selecting an incompatible terminal type will prevent the ring terminals on your wiring loom from seating correctly, leading to poor electrical contact and terminal heat buildup.
Matching Ah Ratings and Dimensions
The physical dimensions of the battery must match the wheelchair's battery tray or box exactly. Whilst it is often possible to upgrade from a 12V 34Ah battery to a 12V 50Ah mobility battery to increase your driving range, you must measure the available cubic space first. A higher Amp Hour (Ah) rating signifies a larger energy reservoir, but it usually results in a larger physical footprint and increased weight. You should ensure the wheelchair's suspension and motor controller are rated for the additional mass of uprated batteries. For a detailed comparison of leading UK options and technical specifications, see our guide on the best batteries for electric wheelchairs.
The Advantage of Maintenance-Free AGM
Lucas mobility batteries utilise sealed AGM technology, making them completely maintenance-free and leak-proof. This is a critical safety feature for wheelchairs used indoors; there is no risk of acid spills on carpets or flooring. These batteries are also classified as non-spillable, which simplifies air travel significantly. They meet strict IATA requirements for carriage on aircraft, allowing you to transport your wheelchair without the complexities associated with traditional wet-cell batteries. The robust construction of these deep-cycle units ensures dependable performance over hundreds of charge cycles, provided they are charged with a compatible AGM-optimised charger. This reliability is essential for maintaining independence and ensuring your equipment is ready for daily use.
To ensure your equipment remains reliable and performs to its original specification, browse our full range of Lucas wheelchair batteries here.
Maximise Your Mobility with Professional Maintenance Standards
Equipping yourself with the correct tools needed to change wheelchair batteries is the most effective way to maintain equipment longevity and avoid unnecessary service costs. By following a structured approach, such as using insulated 10mm or 13mm spanners and applying protective terminal grease, you ensure a safe installation. These technical steps prevent electrical arcing and protect the sensitive electronics within your powerchair's control module.
Once your workspace is prepared, selecting a high-performance power source is the final requirement. As a trusted Lucas battery specialist, UK Mobility Batteries provides premium AGM solutions designed for deep-cycle durability. We offer fast UK-wide delivery to ensure minimal downtime and provide expert technical support via phone or email if you require assistance with battery selection.
Order your replacement Lucas wheelchair batteries today to restore your chair's full range and performance. With the right equipment and technical knowledge, you can manage your wheelchair maintenance with total confidence.
Frequently Asked Questions
Do I need any specialist tools to change my wheelchair batteries?
Most UK powerchairs require only standard household hand tools rather than specialised mechanical equipment. You will typically need a metric socket set or spanners, a Phillips screwdriver, and long-nose pliers for manipulating cables. Whilst professional VDE-certified insulated tools are recommended to prevent short circuits, basic garage equipment is sufficient for a successful replacement. Ensure you have the correct metric sizes to avoid stripping the bolt heads during the removal of the old units.
Can I use a standard car battery charger for my wheelchair batteries?
You should never use a standard automotive car battery charger for electric wheelchair batteries. Car chargers often deliver a high-amperage burst charge that can overheat and damage the sealed AGM or Gel cells used in mobility equipment. Specialist mobility chargers use a specific multi-stage charging profile designed for deep-cycle batteries. Using the incorrect charger will significantly reduce the lifespan of your new Lucas batteries and may void the manufacturer's warranty.
What size spanner do I need for wheelchair battery terminals?
The most common spanner sizes required for UK wheelchair battery terminals are 10mm and 13mm. Smaller travel chairs using M5 bolts may require an 8mm spanner. It is best to check the terminal bolt head before gathering the tools needed to change wheelchair batteries. Using the correct size ensures a snug fit; an ill-fitting spanner can round off the bolt, making future maintenance difficult and potentially compromising the integrity of the electrical connection.
Is it dangerous to change wheelchair batteries myself?
Replacing batteries at home is safe provided you follow basic electrical precautions and have the correct tools needed to change wheelchair batteries. The primary risks involve accidental short circuits across the terminals and the physical weight of the units, which can reach 25kg each. Always remove metal jewellery and disconnect the negative terminal first to isolate the circuit. If you follow a methodical sequence and use insulated tools, the process is a straightforward task.
Should I clean the battery terminals before fitting new ones?
You must clean the ring terminals on your wheelchair's wiring loom before fitting new batteries. Use a wire brush or fine emery paper to remove any lead-oxide glazing or white sulphate powder. This ensures a low-resistance electrical path, which prevents terminal heat buildup and ensures your motor receives full power. Once cleaned and tightened, applying a thin layer of petroleum jelly protects the metal from future corrosion and environmental moisture ingress.
How do I know if my wheelchair batteries actually need replacing?
Sluggish performance on inclines and a noticeable reduction in driving range are the most common indicators of battery failure. You can verify this by checking the resting voltage with a digital multimeter; a healthy 24V system should read above 25.2V when fully charged. If the voltage drops rapidly under load or the chair struggles to complete its usual daily route, the deep-cycle cells have likely reached the end of their service life.
Can I use a power drill to tighten the terminal bolts?
Using a power drill or impact driver to tighten terminal bolts is highly discouraged. Mobility battery terminals are made of soft lead or feature delicate internal threads that can be easily stripped by the high torque of a power tool. Hand-tightening with a spanner or socket allows you to feel the resistance and stop at the required 5Nm to 6Nm. Over-tightening with a drill can permanently damage the battery post, necessitating a full replacement.
What should I do with my old wheelchair batteries once they are removed?
It is illegal to dispose of lead-acid wheelchair batteries in your general household waste or recycling bins in the United Kingdom. You must take spent batteries to a local council Household Waste Recycling Centre (HWRC) or a specialist battery scrap merchant. These facilities ensure the lead and plastic components are safely recycled. Most retailers also offer a take-back scheme, helping you adhere to environmental regulations whilst ensuring hazardous materials are processed correctly.