
Mobility Scooter Battery Not Charging: Troubleshooting and Charger Compatibility Guide
A mobility scooter battery not charging is frequently the result of a simple charger mismatch or a build-up of debris in the charging port, rather than a total battery failure. It is incredibly frustrating to lose your independence because your equipment refuses to power up, especially when technical specifications like Volts and Amps feel like a different language. You rely on your scooter for daily freedom, so any downtime feels like a significant setback. We understand the hesitation that comes with choosing replacement parts, as buying the wrong charger can lead to poor performance or even damage your power cells.
This guide will help you identify exactly why your mobility scooter battery is not charging and provide the technical data needed to restore performance. We will examine common troubleshooting steps, from checking fuse integrity to verifying charger compatibility with your specific AGM or gel battery setup. You will learn how to match the correct Amperage and Voltage to your Lucas battery to ensure efficient charging cycles. By understanding the precise electrical requirements of your device, you can avoid the cost of unnecessary replacements and ensure your scooter remains a dependable tool for your mobility needs.
Key Takeaways
- Identify the primary reasons for a mobility scooter battery not charging, ranging from simple power socket issues to damaged charging leads.
- Master technical compatibility by matching charger voltage and amperage to your specific battery type to prevent long-term component damage.
- Use diagnostic tools and LED sequence interpretations to determine accurately if the fault lies with the charging unit or the internal battery cells.
- Learn to troubleshoot physical connections, including resetting the main circuit breaker and inspecting the internal battery loom for loose spade connectors.
- Ensure a precise replacement by selecting Lucas AGM batteries that match your equipment's original Ampere-hour (Ah) capacity and physical dimensions.
Initial Diagnostics: Why Your Mobility Scooter Won’t Charge
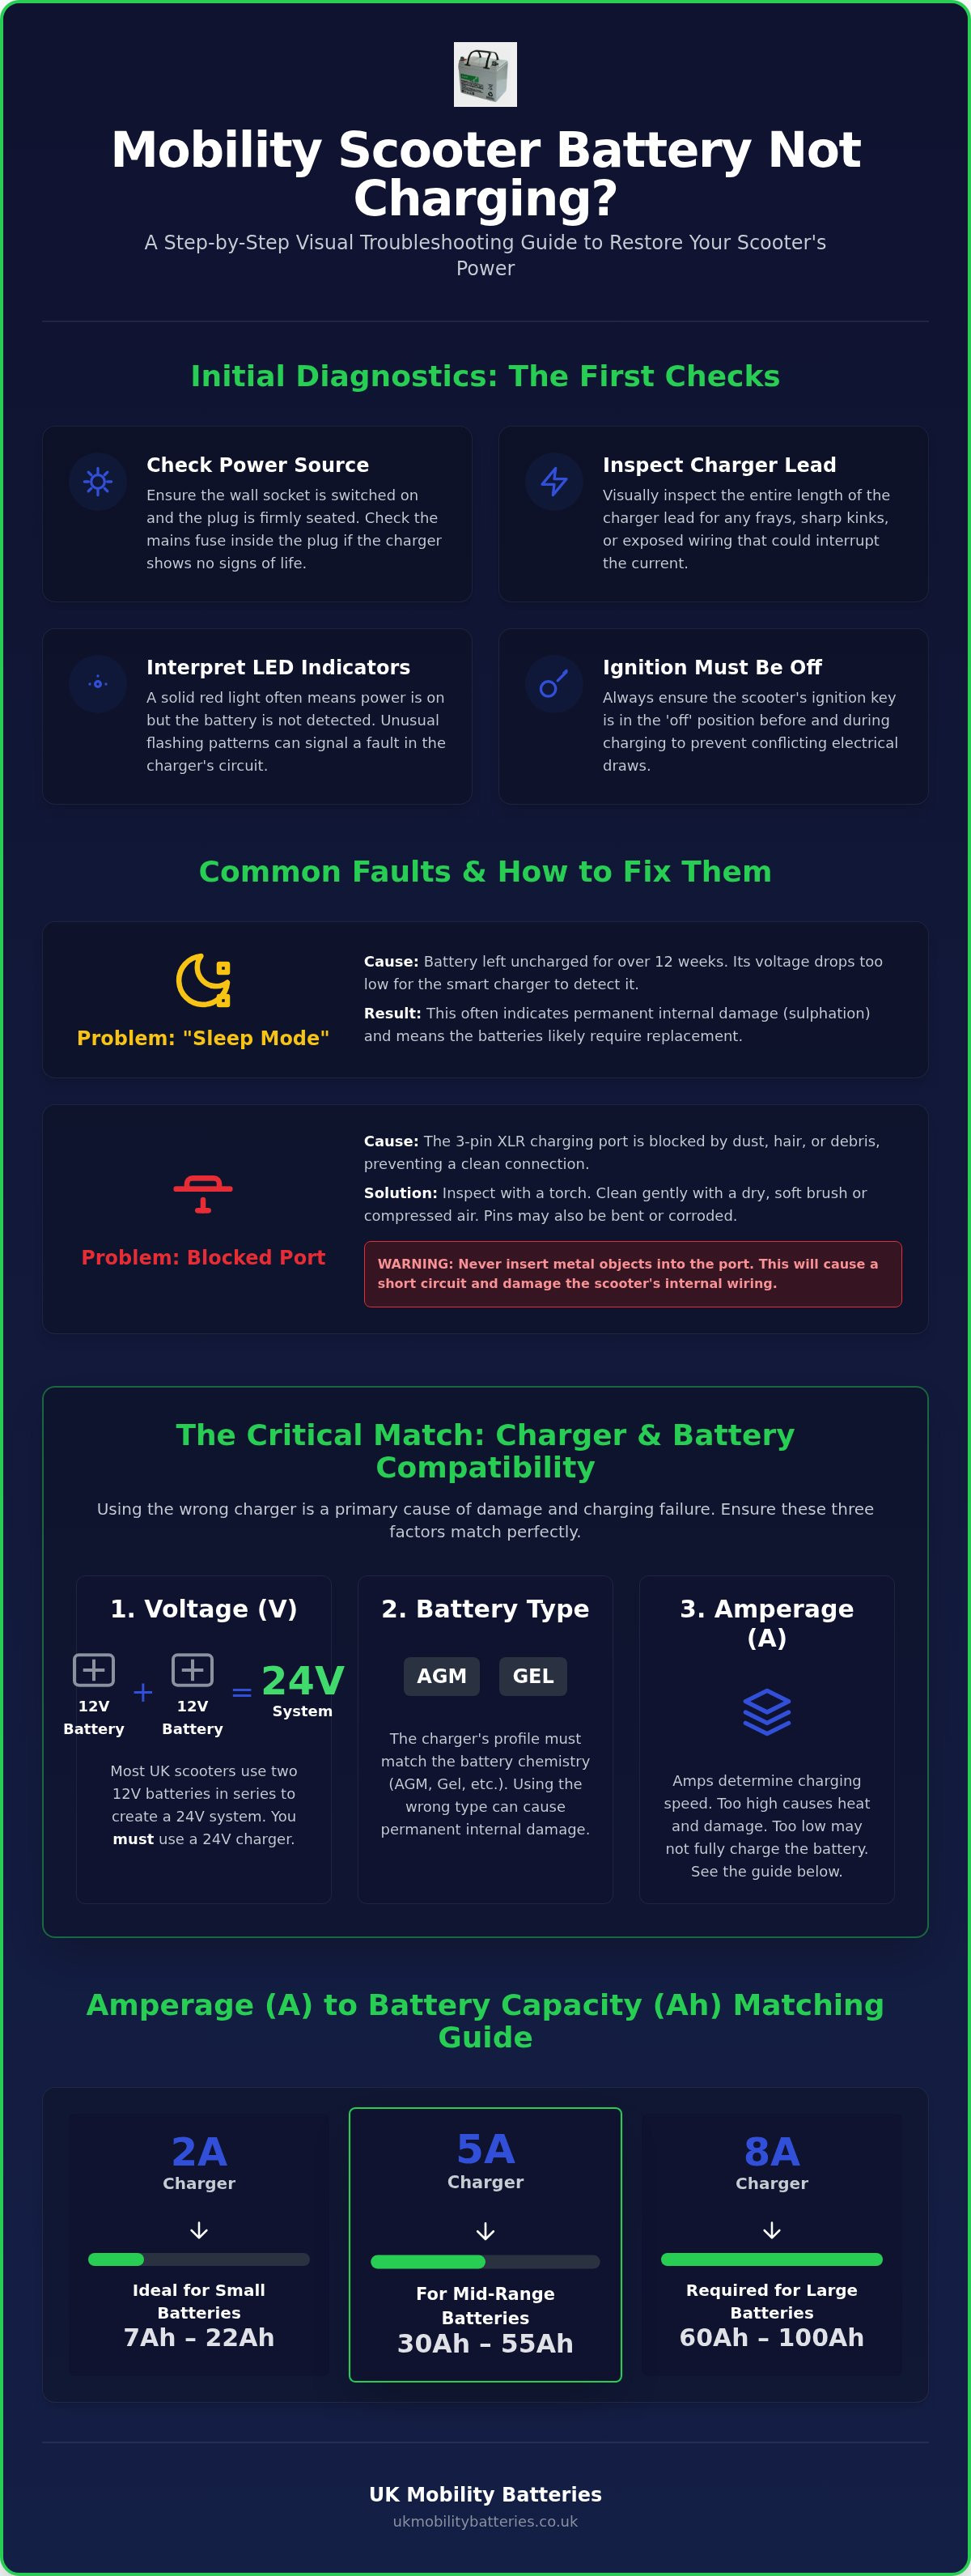
If you find your mobility scooter battery not charging, the first step is to confirm the integrity of the external power supply. Ensure the wall socket is switched on and the plug is seated firmly. You should check the mains fuse in the plug if the charger shows no signs of life. Visually inspect the charger lead for frays, sharp kinks, or exposed wiring; these physical defects can interrupt the flow of current or cause dangerous short circuits. According to this Mobility Scooter Overview, these vehicles rely on consistent electrical input for reliable operation.
Most chargers feature LED indicator lights to communicate their status. A solid red light often indicates power is present but the battery isn't being detected, whilst unusual flashing patterns typically signal a fault in the charging circuit itself. Always ensure the scooter's ignition is in the 'off' position during this process to avoid conflicting electrical draws. For a more detailed breakdown of specific symptoms, refer to our mobility scooter battery troubleshooting guide.
The "Sleep Mode" and Deep Discharge Problem
Batteries that remain uncharged for several months amongst other stored items often suffer from deep discharge. Modern smart chargers require a minimum voltage threshold to initiate the charging cycle. If the voltage of your Lucas 12V batteries drops too low, the charger cannot "see" the battery and will not activate. This "sleep mode" often suggests the battery has reached a point where standard chargers cannot recover the chemistry. If your batteries have been left flat for more than twelve weeks, the internal lead plates may have sulphated. This leads to permanent capacity loss and usually signifies the batteries have reached a point of no return.
Testing the Charging Port for Debris
The standard 3-pin XLR charging port is a common site for technical failure. Dirt, dust, or pet hair can easily accumulate inside the socket, preventing the charger pins from making a clean electrical connection. Inspect the port using a torch to look for bent or corroded pins. If you find debris, clean the area safely using a dry, soft-bristled brush or compressed air. You must never insert metal objects like screwdrivers into the port. Doing so will cause a short circuit and potentially blow the internal fuse on the scooter-side battery loom, leaving your mobility scooter battery not charging even with a functional charger.
The Critical Role of Mobility Scooter Battery Charger Compatibility
Most UK mobility scooters operate on a 24V system, which is achieved by connecting two 12V batteries in a series circuit. Using a charger with the incorrect voltage output is a primary reason for a mobility scooter battery not charging correctly. A standard 12V automotive charger cannot provide the necessary electrical pressure to push current into a 24V series bank. Furthermore, the charging profile must be precisely matched to the battery chemistry. Absorbent Glass Mat (AGM) and Gel batteries require specific voltage curves during the bulk, absorption, and float stages. If you apply a lithium-specific charging profile to a Lucas 12V 34Ah Sealed AGM Deep Cycle Battery, you risk permanent damage to the internal plates because the cut-off voltages do not align.
Amperage ratings are equally vital for maintaining battery health. The Ampere (A) rating of your charger determines the speed at which energy is replaced. Whilst it's tempting to use a higher-rated charger to reduce downtime, excessive current generates internal heat that can warp battery plates. A balanced approach ensures that the charging speed does not compromise the structural integrity of the lead-acid cells.
Matching Charger Output to Battery Capacity (Ah)
To ensure longevity, you should match the charger's Amperage to the battery's Ampere-hour (Ah) capacity. Using a charger that is too powerful can lead to "gassing" and casing deformation. Conversely, an under-powered charger may time out before the battery reaches a full state of charge, leading to sulphation. Use the following general guidelines for matching your equipment:
- 2A Charger: Ideal for smaller batteries ranging from 7Ah to 22Ah.
- 5A Charger: Designed for mid-range batteries between 30Ah and 55Ah.
- 8A Charger: Required for large-capacity batteries from 60Ah to 100Ah.
If you use an 8A charger on a small Lucas 12V 7Ah Sealed AGM Battery, the rapid energy transfer causes the electrolyte to dry out prematurely. Ensuring this balance is essential to prevent your mobility scooter battery not charging efficiently over time. If you need to replace your power source, you can browse our technical guides to find the correct specifications.
XLR Connector Pinouts and Safety Standards
The 3-pin XLR connector is the industry standard for charging interfaces. Each pin has a specific function: Pin 1 is Positive (+), Pin 2 is Negative (-), and Pin 3 is the Inhibit pin. The Inhibit pin is a critical safety component that sends a signal to the scooter's controller to disable the drive motor whilst the charger is plugged in. This prevent the vehicle from being driven away accidentally, which would cause significant damage to the charging socket and lead. The 3-pin XLR connector has remained the primary safety and connection standard for the UK mobility market since the early 2000s. Always verify that the pins are straight and free from oxidation to maintain a low-resistance connection.
Distinguishing Between Charger Faults and Battery Failure
Determining whether the issue lies with the charging unit or the power cells is critical for a cost-effective repair. When you face a mobility scooter battery not charging, the LED indicators on your charger provide the first diagnostic data points. Typically, a solid red light indicates the charger is in the bulk charging phase, whilst a solid green light signifies the battery has reached its full capacity. If the charger displays a flashing green light, it is usually in the final float or maintenance stage. However, if these lights behave erratically, such as flashing red or alternating colours, it often indicates a circuit fault or a battery that cannot accept a charge.
A multimeter is an essential tool for verifying charger health independently. To test a standard 24V charger, set your multimeter to the DC voltage setting and probe Pins 1 and 2 of the XLR connector. A functional charger should register a reading between 27V and 29V. If the reading is zero or significantly lower than the rated output, the internal transformer or capacitors have likely failed. Understanding how maintenance free mobility batteries behave at the end of their lifespan helps you decide if a replacement is necessary or if the charger is simply failing to initiate the cycle.
Symptoms of a Faulty Charger
Physical inspections often reveal charger failure before electrical testing does. If the charger casing remains cold to the touch after several hours of being plugged in, it isn't drawing current or transferring energy. You should also listen for internal rattling, which suggests loose components, or check for a distinct smell of burning electrical insulation. Intermittent charging is another common symptom; if the charging cycle starts and stops when you move the cable, the internal copper cores have likely fractured due to excessive bending or kinking over time.
Signs of Battery Cell Failure
Internal battery degradation, specifically sulphation, manifests through specific performance behaviours. If your charger reaches a solid green full status suspiciously quickly, such as within 30 minutes of a deep discharge, the battery has lost its ability to store energy. This surface charge creates a false reading of being full, but the battery indicator on your dashboard will drop rapidly the moment you apply load. Most critically, any physical swelling or bulging of the battery casing is a sign of internal pressure build-up. This is a severe safety warning; you must stop using the batteries immediately and dispose of them at a local recycling centre, as they pose a risk of leaking or thermal runaway.
Step-by-Step Troubleshooting for Ports and Connections
Physical circuit interruptions are a frequent cause of a mobility scooter battery not charging. You should first locate the main circuit breaker button, which is typically found on the battery case or the rear chassis. This safety device trips during electrical surges or motor overloads; if the button has protruded, press it firmly to reset the connection. If the breaker trips repeatedly, it indicates a deeper electrical fault that requires technical inspection.
Open the battery compartment to inspect the internal loom and wiring. Vibrations from regular travel can loosen T-bar or spade connectors, breaking the continuity of the charging circuit. Ensure every connection is seated tightly. You must also check the fuse, which is often a standard automotive blade fuse housed in a waterproof holder near the batteries. A blown fuse is a physical break in the circuit that will prevent the charger from detecting the battery voltage. For those using portable boot scooters, verify that the battery pack is correctly seated in its cradle, as even a millimetre of misalignment can prevent the contact pins from engaging.
Cleaning and Tightening Battery Terminals
Corrosion is a natural byproduct of the chemical processes within lead-acid batteries. It appears as a white, powdery substance around the terminals and can significantly increase electrical resistance. This resistance generates heat and prevents the full charging current from reaching the cells. Use a wire brush or fine-grit sandpaper to clean the terminals until you achieve a shiny, metal-to-metal connection. High-current deep-cycle batteries like the Lucas 12V 50Ah Mobility Battery require these clean contact points to maintain efficient energy transfer. Once cleaned, you can view our range of replacement connectors to ensure your wiring remains in peak condition.
Cold Weather and Charging Initiation
Temperature plays a critical role in battery chemistry. Attempting to charge a battery that has been stored in sub-zero temperatures is dangerous and highly ineffective. Frozen electrolyte cannot move freely, which leads to internal pressure build-up and potential casing rupture. If your scooter has been kept in a cold garage or shed, bring the battery pack into a warm room for at least four hours before connecting the charger. This allows the internal temperature to stabilise, ensuring the charging process is both safe and efficient. For comprehensive seasonal advice, refer to our guide on winter mobility scooter battery care.
Selecting High-Quality Replacement Batteries in the UK
If your diagnostic tests confirm that the mobility scooter battery not charging is a result of irreversible sulphation or physical casing damage, you must select a replacement that meets the original equipment manufacturer (OEM) specifications. Lucas AGM batteries are the preferred choice for UK mobility retailers because they're engineered for the specific demands of deep-cycle use. Unlike standard standby batteries used in alarm systems, these power cells are designed to handle repeated discharge and recharge cycles without rapid capacity loss. Using a high-specification battery ensures that your vehicle maintains its range and performance over several hundred cycles.
You must always replace batteries in pairs. Even if only one battery appears to have failed, the remaining older battery will have a higher internal resistance. When connected in a series circuit, this imbalance prevents the charger from reaching the correct float voltage for both units, eventually causing the new battery to fail prematurely. Using high-quality AGM technology also ensures your vehicle is safe for indoor storage and public transport, as the sealed design prevents acid leaks even if the casing is tilted during transit.
Why Lucas 12V AGM Batteries Excel
The deep-cycle capabilities of these units are designed specifically for the repetitive discharge patterns of daily mobility use. These batteries feature a maintenance-free design, meaning there is no requirement for topping up electrolyte levels with distilled water. It's a fit and forget solution for users who require dependable performance without technical upkeep. Lucas batteries are designed to meet strict UK safety and performance standards, ensuring they provide the rated Ampere-hour (Ah) capacity throughout their operational life.
How to Order the Correct Replacement Pair
Identifying your current battery is the first step toward a successful replacement. You should check the label of your existing units for the Voltage (typically 12V) and the Ampere-hour rating, such as a Lucas 12V 12Ah Mobility Battery or a larger Lucas 12V 34Ah Sealed AGM Deep Cycle Battery. You must ensure the physical dimensions and terminal types, whether they're spade connectors or nut-and-bolt fittings, match your existing battery loom exactly to avoid installation issues. To restore your independence with reliable power, browse our full range of Lucas mobility batteries for fast UK delivery.
Restoring Reliable Performance to Your Mobility Scooter
Solving the issue of a mobility scooter battery not charging requires a methodical approach to electrical diagnostics. You have learned that verifying charger voltage compatibility and inspecting physical connections, such as the circuit breaker and terminal spade connectors, are essential first steps. Distinguishing between a transformer failure in the charger and chemical sulphation in the battery cells prevents unnecessary expenditure on incorrect components. By following these technical troubleshooting steps, you can accurately identify whether the fault lies with the charging hardware or the power cells themselves.
When diagnostics reveal that your power cells have reached the end of their operational life, selecting a high-specification replacement is vital for long-term dependability. As an authorised Lucas battery retailer, we specialise in premium deep-cycle AGM technology designed specifically for the rigorous demands of mobility applications. We provide fast national UK delivery to ensure you can return to your daily routine with minimal delay. Find the perfect replacement Lucas batteries for your scooter here. With the correct technical information and high-quality components, you can maintain your freedom of movement and ensure your equipment remains a reliable asset for years to come.
Frequently Asked Questions
Why is my mobility scooter charger light flashing green?
A flashing green light typically indicates that the charger is in the final float or maintenance stage of the charging cycle. At this point, the batteries are approximately 95% charged and the unit is providing a low-current trickle to reach 100% capacity. If the light flashes green immediately upon connection, it may suggest a mobility scooter battery not charging because the voltage is already at the maximum threshold or the charger cannot detect the battery load.
Can I use a car battery charger on my mobility scooter?
You cannot use a standard car battery charger on a mobility scooter. Car chargers are designed for 12V lead-acid starter batteries and lack the specific 3-stage charging profile required for deep-cycle AGM or Gel cells. Most mobility scooters require a 24V output to charge two batteries in series. Using an automotive charger can result in severe overcharging, gassing, or a total failure to initiate the charge cycle.
How long should I charge my mobility scooter batteries for?
You should charge your mobility scooter batteries for 8 to 12 hours after every journey, regardless of the distance travelled. This duration ensures the charger completes the bulk, absorption, and float stages necessary for chemical stability within the cells. Even for short trips, a full overnight charge is recommended to prevent the onset of sulphation and to maintain the long-term health of your Lucas AGM batteries.
What happens if I leave my mobility scooter charger plugged in all the time?
Modern smart chargers are designed to be left connected until the vehicle is next required, as they automatically switch to a maintenance mode once the batteries are full. However, it's best practice to disconnect the charger from the mains if the scooter will be stationary for more than 48 hours. This precaution protects the charger from electrical grid surges and prevents the internal components from unnecessary wear during periods of inactivity.
My charger is getting very hot, is this normal?
It is normal for a charger to feel warm during the bulk charging phase when it's transferring maximum current, but it should never be too hot to touch comfortably. Excessive heat often indicates the charger is struggling to overcome high internal resistance in aging batteries. If the unit emits a burning smell or the plastic casing shows signs of discolouration, you must disconnect it immediately and check your batteries for physical swelling.
Can I replace just one battery in my mobility scooter?
You must never replace just one battery in a 24V mobility scooter system. Batteries connected in series must have matched internal resistance to charge and discharge at the same rate. If you install a single new battery amongst an old one, the charger will misread the total voltage. This imbalance leads to the new battery being overcharged and the old one undercharged, causing both units to fail prematurely.
How do I know if my mobility scooter charger is broken?
A mobility scooter battery not charging is often confirmed as a charger fault if the unit remains cold to the touch after several hours or if the LED lights fail to illuminate entirely. You can verify the output using a multimeter set to DC voltage; a functional 24V charger should register between 27V and 29V at the XLR plug pins. If the reading is zero, the internal transformer or fuse has likely failed.
Why does my scooter show full charge but die quickly when I drive it?
This behaviour is a classic symptom of "surface charge," where the battery voltage appears high but the actual capacity has been lost due to sulphation. Whilst the charger and dashboard indicator show a full state, the cells can no longer hold the energy required to sustain movement under load. When you engage the motor, the voltage collapses instantly. This indicates that your batteries have reached their end-of-life and require replacement with a matched Lucas pair.